Showing posts with label waltzingmouse stamps. Show all posts

Friday, 19 April 2024

Card maker's recipe

Kathy is setting our challenge at Daring Cardmakers today and she’s sending us to the card maker’s kitchen with a recipe.

Our classic ingredients are flour (flowers), butter (yellow), eggs (oval shape, nest, bird) and sugar (glitter). I think I might have the wrong lid on an ink pad as one of my flowers came out more orange than yellow but I decided my cake was a St Clements and rolled with it!

I gave the stamped flowers a few flicks of Copic marker for just a bit of depth and then cut them out and arranged them on the stitched rectangle die cut, I often like to have an edge of some sort that things can break out of! A scattering of pearl pen dots with some glitter and an oval sentiment panel to fulfil my recipe requirements and call it done.

Stamps:
Funky Flowers (Waltzingmouse Stamps, no longer with us)

Paper:
Bristol board
DCWV textured

Ink:
Versafine by Tsukineko (Onyx Black)
Jenni Bowlin ink by Ranger (Lemon Drop)
Tim Holtz Distress Oxide by Ranger (Twisted Citron)
Adirondack dye ink by Ranger (Sunshine Yellow — or possibly Sunset Orange!)
Memento Luxe by Tsukineko (Dandelion, Pistachio)

Other:
Stitched rectangle dies A6 size (Paper Rose)
Pearl Pen by Viva Decor (Ice White)
Glamour dust by DecoArt (Crystal)

Thanks for stopping by!


Friday, 26 May 2023

She sells sea shells...

It's time for a new challenge at Daring Cardmakers and this time Rizwana would like to see shells on our projects.

I was away on holiday last week so of course I suffered the usual syndrome of a couple of false starts on your first crafty session but I eventually managed something half way decent by sticking to clean and simple.

Shells from one of my all time favourite stamp sets, a bit of basic masking, watercolouring with Distress inks and my usual rounded corner and call it done.

Stamps:
Antique Engravings (Hero Arts, retired)
Big Day Today (Waltzingmouse Stamps, no longer with us)

Paper:
Watercolor

Ink:
Versafine by Tsukineko (Onyx Black, Vintage Sepia)
Tim Holtz Distress ink by Ranger (Tea Dye, Vintage Photo, Walnut Stain, Peacock Fathers, Tumbled Glass, Black Soot)

Other:
Corner Chomper

Sea shells make for a great summery projects - why not check out the rest of the design team's ideas and come join us?


Friday, 24 June 2022

Midsummer

Jenny is setting our challenge at Daring Cardmakers this week and as we've just celebrated midsummer's day, she'd like to see cards inspired by midsummer and all that nature has to offer at this time of year.

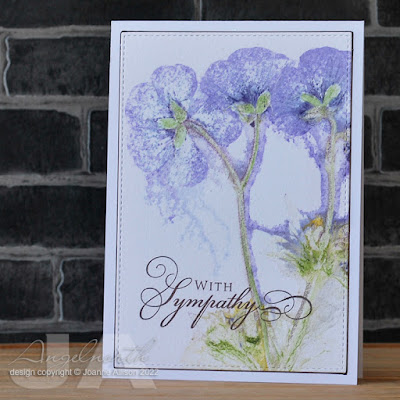
I decided to do a flower print. We have some beautiful deep magenta geraniums in our front garden so I picked a sprig from there — it's such a striking colour that walkers have been known to stop and ask if they can take a bit of a plant for their own garden!

This is one of those techniques where you never quite know what you'll get. You just sandwich the plant between two pieces of paper and run it through your die cutter to squish it. Strong colours and soft leaves/flowers tend to work best although don’t expect to get on paper what you see “in the flesh” — the deep magenta flowers gave a delicate purple print. Once you’ve squished, just leave it alone for a while to dry and then brush off the fragments of plant.

I needed a sympathy card recently and I told myself I really should have one or two in my stash as you often don't feel like making one when you need one. I thought this print looked as though it would be perfect with a sympathy sentiment so that's what I did and I now have a card for the box, ready if I need it. Of course you get two prints from one plant, I'll use the other one for something else. 

Supplies:
Watercolour paper
Flower sprig
Stitched rectangle dies (Paper Rose)
Sentiment from Big Day Today (Waltzingmouse Stamps, no longer with us)
Brilliance by Tsukineko (Pearlescent Chocolate)
Fineline marker (dark brown)

Thanks for stopping by!


Sunday, 2 January 2022

The last link of 2021!

It’s time for the reveal of the last Card Chain Challenge of 2021 — Gail and Jo followed the pattern they set last year by giving us a tic-tac-toe board to play with for December but a five by five one this time (so no way was I even thinking about trying for a full house!)  

My card went to the lovely Jo and I played with the right-most vertical line of the board — white, merry, Santa, circle, red. I figured Santa’s hat would be enough of an indication that “Santa woz ’ere”. I somehow got it into my head that I was supposed to have silver as an element as well but that was actually on a completely different line. Never mind, it made the circles nice and festive!

The hat is stamped, coloured and cut out, sentiment and circles are die cut and there’s a doodled frame to finish it all off. 

Stamps:
Ho Ho Ho (Visible Image)
Noel (Waltzingmouse Stamps, no longer with us)

Paper:
Bristol board
Silver mirror card

Ink:
Brilliance by Tsukineko (Graphite Black)

Other:
Copic markers
Silver gel pen
Circle Nestabilities
Fine frames die, circle (Altenew)
Washi tape
Gel glue (Pinflair)
Corner Chomper 

Friday, 17 September 2021

Circles and words

Jenny is setting the challenge for us today at Daring Cardmakers and she’d like to see circles featuring as a design element. I wanted to use this Bubble Border stamp as it has loads of circles and so decided to combine with the latest challenge at Lost Coast Designs which wants us to use sentiments of at least five words. 

It really is a champagne celebration - this border stamp has been in my stash for 10 years this month! It’s seen a fair bit of use in that time so I reckon it was money very well spent as I don't think it has dated at all (and looking on the Lost Coast shop now I see it’s still only $4!). I heat embossed with gold powder and then used several shades of gold watercolour paint to fill in the circles. I used a couple of pen caps as stamps to add bubbles breaking out from the central column and finished with some sequins and the simply matted sentiment panel. 

Stamps:
Bubble border (Lost Coast Designs)
Putting on the Ritz (Waltzingmouse Stamps, no longer with us)

Paper:
Bristol board 

Ink:
Versamark by Tsukineko
Delicata by Tsukineko (Golden Glitz)
Versafine by Tsukineko (Onyx Black)

Other:
Gold detail embossing powder
Gansai Tambi Starry Colours
Stitched rectangle dies (Paper Rose)
Sequins
Corner Chomper


Friday, 14 May 2021

Proud as a peacock

It's my turn to set the challenge at Daring Cardmakers this week - I'd like to see projects inspired by the beauty of the peacock. It could be an image of the bird itself, a beautiful "eye" feather or just the gorgeous colours applied to other images.

I decided to combine with the current challenge at Let's Squash It which is asking us to create some white space while we're embossing and add some bling. 

This peacock feather is slap bang in the middle of the folder - it makes a lovely dramatic focal point but leaves little flexibility for anything else.

I managed to position a card front in the folder so that the feather is on one side, leaving plenty of flat real estate for a good-size sentiment. The slot at the top of the folder is helpful as you can angle the card by letting a corner poke through.

The feather is coloured with several media, all of which have metallic or iridescent finishes which don't really show up on the photo - please use your imagination to supply peacock sheen! My go to tiny gems add a bit extra bling.

Stamps:
Putting on the Ritz (Waltzingmouse Stamps, no longer with us)

Paper:
Bristol board

Ink:
Versafine (Onyx Black)

Other:
Peacock feather folder (Darice)
Metallic pencils
Metallic markers
Perfect Pearls
Spica glitter pen (Turquoise)
Nail art gems

Thanks for stopping by!

Tuesday, 29 December 2020

Squash and snip

The first cards I've found myself in need of post-Christmas are not necessarily the ones you want to be making - a thinking of you for a friend and a sympathy card.

I used the current Let's Squash It challenge as inspiration for both of them. The challenge is to use a folder and die cutting or fussy cutting. I actually did both for the Thinking of you card - die cut the oval panel and fussy cut part of the embossed design so I could tuck the oval into the flowers and foliage. My dad bought me this folder as a Christmas gift - it's a beauty isn't it?

I embossed some grey cardstock, highlighted the texture with some gilding wax and used a gold gel pen in the flower centres for a bit of subtle variation. 

Stamps:
A very old HOTP sentiment set

Paper:
Grey
Bristol board 

Ink:
Hero Arts shadow ink (Soft Granite)
Brilliance by Tsukineko (Graphite Black)

Other:
Flower Frame 3D folder (Nellie Snellen)
Silver Rub n Buff
Oval dies (Spellbinder)
Gold gel pen

For the sympathy card, I wanted just a little bit of embossing on a clean and simple design - I put the card in the folder and bashed one corner with a hammer (I think this was the first embossing folder I ever owned ). Then I  rubbed a tiny bit of microglaze on the raised bits and washed over with watered down Distress ink. I left the die cut feathers simple white and added a few tiny gems as it looked a bit unfinished somehow but as it’s a sympathy card I didn’t want anything too in your face.  

Stamps:
Big Day Today (Waltzingmouse Stamps, no longer with us)

Paper:
Bristol board 

Ink:
Tim Holtz Distress ink by Ranger (Tumbled Glass)
Brilliance by Tsukineko (Pearlescent Chocolate)

Other:
Feathers dies (Spellbinder)
Textile Texture embossing folder (Cuttlebug)
Microglaze
Nail art gems
Corner Chomper 

Thanks for stopping by - there are a couple of days left if you fancy joining in at Let's Squash It.

https://blogger.googleusercontent.com/img/b/R29vZ2xl/AVvXsEgn1rOr3ECXMsr6eNszD4qTOBqlJTpOIT5rY5g1wayrkEZQ00nSSerE0yYr-KWI9F1-lVWPCn7SQnkvLWwXTITIMGC8l6EWeh5dcf5-ASlYKpZjS9M72MxllyQRmmbuEuiYldK7OZ9FwAbT/s255/Challenge+badge+%25233.jpg

Friday, 18 December 2020

Tags, label and toppers

Our theme for the final week of our Christmas Countdown over at Daring Cardmakers is tags, labels and toppers - thing to decorate your parcels with.

These would have been quick and easy but those die cuts ain’t half fiddly - it took ages to get all the little bits to pop out, even though they’d cut cleanly. Dad picked up a few dies for me when they were on sale at The Works, back before the world went wonky, and this was one of them. It’s pretty, with a sort of vintage vibe, and looks lovely cut in glitter cardstock - I just need to remember it’s not one to use if I’m in a rush (or try the waxed paper trick next time)!

The glitter card is super-sparkly in real life - I bought a pack in the local pound shop ages ago and it’s a good weight for die cutting. A little bit of ink applied to the tag edges with a brush, a simple stamped image and a knotted ribbon complement the die cut.

Stamps:
Festive Foliage (Waltzingmouse Stamps, no longer with us)

Paper:
Mixed media by Hannemuhl 
Silver glitter

Ink:
Brilliance by Tsukineko (Pearlescent Chocolate)
Tim Holtz Distress ink by Ranger (Antique Limen)

Other:
Merry Christmas die (The Works)
Tags dies (Tim Holtz/Sizzix)
Ribbon

Thanks for stopping by, after this challenge DCM is taking a break until January 8th - hope you can join us! Wishing you a happy, healthy and peaceful Christmas and New Year. 

Friday, 11 December 2020

Animal antics

It's Countdown to Christmas number six over at Daring Cardmakers and today our theme is "animal antics" - make anything you like as long as it features a Christmas critter or two.

When I saw the Cool Yule set on sale a while back I knew I had to get it for the reindeer head. A friend has a felt and fabric deer head on her wall year-round (he has a Libery print fabric nose) and I couldn't resist the idea of making a Christmas card for her although I didn't go for the ditsy floral nose in the end! I cut all the pieces from white card and added colour with markers. He's a bit fiddly but it's satisfying to see him emerge as you assemble the individual bits. 

His leafy wreath is not really a Christmas stamp but I figured if I gave it red ribbon and red berries it would make a reasonable festive stand-in. I used a glitter pen on the berries for just a touch of sparkle.

Stamps:
Queen Bee (Crafty Secrets, no longer with us)
Noel (Waltzingmouse Stamps, no longer with us)

Paper:
Bristol board

Ink:
Tim Holtz Distress ink by Ranger (Bundled Sage)
Momento Luxe by Tsukineko (Love Letter)

Other:
Cool Yule dies (Tim Holtz/Sizzix)
Copic markers
Gel glue (Pinflair)
Spica glitter pen (red)
Corner Chomper


Thanks for stopping by!

Friday, 27 November 2020

Boxes and bags

The theme in this week's Christmas countdown over at Daring Cardmakers is “boxes and bags” - make something to present a gift in.

I hope Kathy will forgive a slight stretching of the brief - I used a little tin and prettied it up with some paper crafting supplies. The tin originally contained travel sweets and came from a car showroom as a freebie. Die cutting a circle to exactly the right size hides the car branding quite nicely!

I'm afraid my camera battery died just as I needed to take my last minute photos so I had to made do with my phone - apologies for the photo quality!

I made a coordinating card as well so I’m playing again at Let’s Squash It. The challenge is totally to blame for this embossing folder in any case - I saw it on a couple of earlier entries and thought it looked lovely and then found it on a well known auction site for under three quid. Since you can pay that much for a single greeting card I decided I could justify buying it!


Stamps:
Festive Foliage, Compliments of the Season and Noel (all Waltzingmouse Stamps, no longer with us)

Paper:
Bristol board

Ink:
Brilliance by Tsukineko (Pearlescent Chocolate)
Tim Holtz Distress Oxide by Ranger  (Evergreen Bough
)

Other:
Pine Needles embossing folder by Richard Garay
Circle Nestability by Spellbinder
Stitched rectangle dies A6 size by Paper Rose
Corner Chomper 


Friday, 13 November 2020

Gorgeous gifts

It’s the second week of our Christmas countdown over at Daring Cardmakers and this week we’re all about gorgeous gifts. It could be a card featuring images of pretty packages, a gift card holder, a paper crafted gift for a friend...what can you come up with?

I always check out the Christmas Kickstart challenge (although I don’t manage to play very often) and owner Jo has teamed up with Gail in Let’s Squash It, a challenge dedicated to embossing folders. I’d been thinking recently I don’t play with my EFs nearly enough so perhaps this will give me a push! They have a joint challenge going on at the moment so I’ve made something to hit three targets - go me!

The sunshine is bright in Northumberland this afternoon so apologies if the photo looks washed out - just imagine understated sophistication! 

I die cut squares and rectangles for my packages, brayered ink onto my folder and embossed two of them. The third has stamped snowflakes. A bit of glitzy silver thread, a doodled border and a stamped sentiment and call it done. 

Stamps:
Flurries and Noel (both Waltzingmouse Stamps, no longer with us)

Paper:
Bristol board

Ink:
Delicata by Tsukineko (Silvery Shimmer)
Tim Holtz Distress ink by Ranger  (Tumbled Glass
)

Other:
Moonlit Berries embossing folder by Couture Creations
Silver thread

Silver gel pen
Corner Chomper 

Thanks for stopping by, keep safe!

Come visit one (or more!) of these challenges!

The Current Challenge     


Friday, 18 September 2020

Masculine makes

Our challenge over at Daring Cardmakers today is set by Dawn. She says she always struggles with masculine cards so she's looking for ideas so that she can have a stack at hand - show us your masculine makes!

The men I make cards for tend to like clean and simple, no frills designs. In fact, while I was snapping this card, my hubby walked past and said "Oh, that's a nice one!" So, ink, stamps and an aperture cut with a die to use as a stencil and that's as fancy as this got. I have a couple of acetate sheets with various size circles cut in them that live on my desk ready for use as stencils.

Stamps:
Teasels (Bee Crafty)
Sentiment from Big Day Today (Waltzingmouse Stamps, no longer with us)

Paper:
Bristol board

Ink:
Tim Holtz Distress ink by Ranger (Mustard Seed, Spiced Marmalade, Barn Door, Fired Brick)
Versafine by Tsukineko (Onyx Black)

Other:
"Stencil" cut with circle Nestie
Corner Chomper

Thanks for stopping by, hope you are keeping safe and well and managing to carry on as near normal as possible with whatever restrictions you have in place for your area.

Friday, 26 June 2020

Let's go 3D

It's Dawn's turn to set our challenge this week at Daring Cardmakers and she's asking us to go 3D - make a bag or a box!

I always find myself wanting different ways to present gift cards come Christmas so I had a go at a pop up box and made it Christmassy!

I particularly liked the idea of adding a little extra, so I used this tutorial. I found a stash of Bazzil cardstock recently so picked out Limeade for a slightly brighter take on Christmas colours.

I did tweak the the tutorial as I added an extra bit so there's a divider towards the front to tuck the little extra into. I love her idea of the tube of Rolos but you could substitute other chocolate or sweets or something like a lipstick or mascara for a girlie gift I reckon. I also punched a half circle thumb hole to make the lid easier to open and clipped the back corners of the lid into a slope.

Slide the ribbon off, open the box and ta-da! (An old NT membership card is standing in as body-double for a gift card here).

Stamps:
Noel (Waltzingmouse Stamps, no longer with us)
Holly (Freebie magazine stamp)

Paper:
Bazzil (Limeade)
Deep red
Bristol board

Ink:
Versafine by Tsukineko (Crimson Red)
Brilliance by Tsukineko (Graphite Black)

Other:
Labels die by Spellbinder
Circle punch by Fiskars
Red Spica glitter pen
Stitch tags dies by Waltzingmouse Stamps
Red gingham ribbon

Thanks for stopping by, take care and stay safe if you are somewhere where restrictions are easing.

Friday, 13 December 2019

Oh, Christmas tree

Trees are taking centre stage over at Daring Cardmakers this week - Christmas trees, bare branched wintery trees, festive or not, just show us a tree or two.

It’s a double dose of trees from me! I used the technique of inking up and stamping onto an embossing folder before running it through the Big Shot to get the impression of fir trees behind the birch trunks. Adding a torn strip of paper inside the folder stops ink going onto to the lower portion of the cardstock and  gets you an easy horizon line. I then decided to step it up a notch and add colour to the embossed trunks with a teeny tiny paint brush and some inks - darker brown for the markings on the bark and a very light beige to add some shading down one side of each trunk.

I didn’t want to cover anything up really so I added a sentiment on a vellum strip so the scene is still visible behind it. The strip is stuck on with double sided tape sheet - covering the whole strip is a good solution to the age old problem of how to attach vellum without the adhesive showing! Gel pen lines give the strip a slightly more finished look.

Stamps:
Lovely as a Tree (Stampin Up!)
Sentiment from Noel (Waltzingmouse Stamps, now available from Gina K)

Paper:
Bristol board 
Vellum

Ink:
Tim Holtz Distress ink by Ranger (Tumbled Glass, Salty Ocean, Pine Needles, Vintage Photo, Antique Linen)
Versamark by Tsukineko 

Other:
Detail gold embossing powder 
Woodland embossing folder (Stampin Up!)
Gold gel pen
Double sided tape sheet
Corner Chomper 

Here's this week's cover sheet if you'd like to share it


Thanks for stopping by!

Tuesday, 3 December 2019

Classic (retro) Christmas

The lovely folk at Retro Rubber invited me back as guest designer this week. The challenge is red, green and white on a Christmas card and, as ever, stamps that are at least a year old.

I revisited an old Crafty Secrets set that I’ve had since 2011. I stamped the light bulb in red and green Distress inks, hand drew the string to link them then used the same inks to colour them and add a very dilute wash of colour around each bulb for the “glow” of the lights. I used a silver gel pen to add metallic detail at the top of each bulb.  The pine  branches add an extra shade of green.

The sentiment is retro too - even though this set is now available from Gina K, mine is the original Waltzingmouse Stamps set from 2014.

Stamps:
Christmas Joy (Crafty Secrets, no longer with us)
Noel sentiment set (Waltzingmouse Stamps, now available from Gina K)

Paper:
Watercolour

Ink:
Tim Holtz Distress inks by Ranger (Mowed Lawn, Barn Door, Pine Needles)

Other:
Fineline marker
Silver gel pen 
Corner Chomper 

Thanks for stopping by!

Wednesday, 11 September 2019

Making a song and dance


As I had this dancing snowman out on my desk it seemed only right that I should join in with the current Lost Coast/Carmen’s Veranda challenge where the theme is “song and dance” and add another Christmas card to my stash.


I thought the Bubble Border would make a fun hillside for him! I heat embossed with white powder and blended a couple of Oxides inks over it then added a wee bit of shading with a couple of Copics and gave a few circles the Wink of Stella treatment for just a touch of festive glitz.

The snowman is stamped on the card base so his little arm waggle lines and scarf fringe are there. I coloured and fussy cut another one and stuck him on with some gel glue so he has a bit of dimension.

Stamps:
Bubble Border (Lost Coast Designs)
Dancing Snowman (Cornish Heritage Farms, no longer with us)
Frosty in the Pines and Compliments of the Season (both Waltzingmouse Stamps, no longer with us - the sentiment set is available from Gina K though)

Paper:
Bristol board

Ink:
Versamark by Tsukineko
Brilliance by Tsukineko (Graphite Black)
Tim Holtz Distress Oxide by Ranger (Cracked Pistachio, Evergreen Bough)

Other:
Bright white detail embossing powder by Wow
Copic markers
Clear Wink of Stella marker
Enamel Accents by Ranger 
Pinflair glue gel

Thanks for stopping by!

Friday, 16 August 2019

Splish, splash, splosh

My turn to set the challenge over at Daring Cardmakers this week and I'd like to see everyone gettting loose and unstructured with inks, watercolours or paints - sploosh, spray and splatter to your heart's content for a focal point, background or accents on your project.

I smooshed my DOX pad onto a piece of acetate, sprayed with water and used it to add drippy ink to my card base. The mistletoe is coloured with Copics, cut out and popped up with a bit of gel glue. The berries have some Glossy Accents for dimension.

And look - I used washi tape! Not sure I've ever used washi tape with anything like success but my local Poundland recently had tubs with six different rolls in each and I couldn't resist a couple of tubs - I think this striped one from the silver/grey/white selection goes well with the stripes in the mistletoe leaves.

I'm playing at Retro Rubber as well where the theme is "anything goes" as long as it features stamps more than a year old. Festive Foliage has been around since 2010.

Stamps:
Festive Foliage (mine is the original Waltzingmouse Stamps set with 2010 copyright, the same design is now available from Gina K with a few minor differences)
Sentiment from an ancient Skipping Stones set 

Paper:
Bristol board

Ink:
Tim Holtz Distress Oxide by Ranger (Cracked Pistachio)
Brilliance by Tsukineko (Pearlescent Chocolate)

Other:
Copic markers
Washi tape
Corner Chomper
Glossy Accents
Pinflair glue gel

Thanks for stopping by!

Tuesday, 30 July 2019

Tic tac toe at Retro Rubber

I'm Guest Designing for Retro Rubber for the challenge that has just gone live as this dragonfly card was chosen as a Top Pick - thanks Retro Rubber! It's one of their fun tic tac toe boards this time:


I chose a diagonal line and used gems, texture paste and heat embossing to make a little scrapling. I'm trying to get going on some Christmas cards since I've not been building up a stock over the year so far!

I started with a scrapling base of kraft cardstock and added some pearlescent texture paste through a stencil that's cut with a Spellbinder die. While that was drying, I stamped the ornament with a light ink and used Copics to colour it, then overstamped with Versamark and heat embossed with gold. With this image I find the little dots are small enough that if I try to Copic colour after embossing, the detail gets lost as the alcohol ink colours the embossing too. A Misti makes it easy to do it the other way though!

Stamps:
Holiday Ornaments (Waltzingmouse Stamps, no longer with us - set is dated 2011)

Paper:
Kraft
Bristol board

Ink:
Tim Holtz Distress ink (Antique Linen, Vintage Photo)
Versamark
Brilliance by Tsukineko (Pearlescent Chocolate)

Other:
Copic markers
Detail gold embossing powder
Silver thread
Iridescent Paste by Maimeri
Stencil cut with Fancy Lattice die (Spellbinder)
Nail art gems
Corner Chomper
Misti

Thanks for stopping by!

Friday, 19 July 2019

Cactus sunset

It's Miri setting our challenge over at Daring Cardmakers this week and she'd like to see a cactus or cacti on our cards. As they make her think of summer I’ve opted for hot colours, too.

I'm ashamed to say that this is the first time the landscape strip featuring cacti has seen ink! Given the length of time Waltzingmouse Stamps has been closed that says it’s been far too long!

I masked the strip using low tack tape, blended three ink colours into it and then stamped the silhouettes using the Misti to help make sure I got good coverage - a simple one layer card. The rider was a last minute addition and I’m still not sure I didn’t prefer it just with the landscape!

Stamps:
Way Out West and Back in the Saddle (both Waltzingmouse Stamps, no longer with us)

Paper:
Bristol board 

Ink:
Versafine by Tsukineko (Onyx Black)
Tim Holtz Distress ink by Ranger (Mustard Seed, Spiced Marmalade, Barn Door)

Other:
Misti
Corner Chomper 

Thanks for stopping by!

Friday, 3 May 2019

May's elements

It's the first Friday of the month so that means an "elemental" challenge over at Daring Cardmakers. Shabneez has chosen the inpsiration picture for May - as ever, just chose at least three elements to kickstart your project.

I chose dragonfly wings, irridescent blue/green and splashy metallic gold (from the hands bottom left).

All my stamps are older than a year so I'm playing along at Retro Rubber as well where it's currently "anything goes"!

Stamps:
Poppies (Crafty Secrets, no longer with us. Set is dated 2010)
Splat That and sentiment from Big Day Today (both Waltzingmouse Stamps, no longer with us. Sets dated 2013)

Paper:
Bristol board

Ink:
Brilliance by Tsukineko (Graphite Black, Pearlescent Chocolate)

Other:
Copic markers
Copic Spic glitter pen (turquoise)
Flitter Glu by Indigo Blu
Mega Flake by Indigo Blu (Chariot of Fire)
Corner Chomper
Scor It

Here's the picture if you didn't come via DCM and would like to play along:


Thanks for stopping by!