Showing posts with label guest designer. Show all posts

Thursday, 9 June 2022

Make it Manly

It’s time for a new challenge at Let’s Squash It and I’m delighted to be joining Gail and Jo as guest designer for this one. You can use any embossing folder you like as long as your card is manly! All the details are here.

My hubby is a bit of a wine buff so when I saw this stamp and die set at a bargain price a few months ago I knew I had to get it! Several other family members and friends will likely be seeing it too. There’s a die as well but I actually cut the row of corks out by hand as I wanted to make it shorter by cutting one off the end - it's an easy shape to cut. The word is die cut from tomato paste tube and has come out very shiny on the photo! 

The embossing folder seemed appropriate as I thought the circles might be a bit reminiscent of cork ends and the optical illusion of them bulging in the centre might be an indication of a glass too many!

I find keeping a limited, neutral colour palette is always useful when you’re trying to make a more masculine card.

Stamps:
Wine corks (Spellbinder, stamp and die set)

Paper:
Bristol board and smooth black

Ink:
Brilliance by Tsukineko (Graphite Black)

Other:
Copic markers
3D Circles embossing folder (cArt-US)
Stitched rectangles dies, A6 size (Paper Rose)

Thanks for stopping by - we'd love to see you over at Let's Squash It with some manly makes!


Tuesday, 2 March 2021

Tic tac toe on the ocean

I’m delighted to be guest designing for the current challenge at Retro Rubber. It’s one of their tic tac toe challenges this time, I always enjoy playing these. I picked the middle row: neutrals-the ocean-colouring with inks, markers or pencils. 

The shells are from a Hero Arts set that is one of my all time favourites. Sadly, I believe it’s retired now. I stamped and masked the two larger shells on toned grey paper and stamped the smaller shell separately so that I could pop it up slightly with some gel glue. I used several shades of grey and a white pencil to colour the images, masked them and sponged ink over a die cut for the net effect. The sentiment is from another favourite old set by Crafty Secrets. 

The "light through water" effect at the top is a stencil -  just ink lightly over it once and then shift it slightly and do it again.

Stamps:
Antique Engravings (Hero Arts, I’ve had mine since about 2013)
Sentiment from Seaside (Crafty Secrets, no longer with us, I’ve had mine since 2008)

Paper:
Bristol board
Strathmore Toned Grey

Ink:
Brilliance by Tsukineko (Pearlescent Chocolate)
Hero Arts shadow ink by Ranger (Soft Granite)

Other:
Pearl pen by Viva Decor (Ice White)
Coloured pencils
Stitched rectangle dies, A6 size (Paper Rose)
Netting  die cut (Marianne Designs)
Fibres stencil (Visible Image)

Wednesday, 10 February 2021

Heartfelt

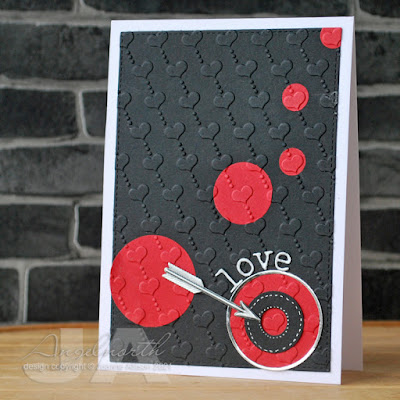
I’m delighted to be Guest Designer at Let’s Squash It for this month’s challenge where the focus is on love and romance. Pull out your embossing folders with hearts, Cupids, words of love etc and throw in some red and/or pink - all the details here!

I decided to try the “embedding” thing which is a trick I’ve failed to get round to until now. Basically, just stick die cut shapes on the piece you’re going to emboss, run the whole lot through the machine in the folder and the embossing process squishes the shapes into the base layer so it looks seamless. It works best if the folder has a fairly close “all over” kind of pattern and I thought these heartstrings would fit the bill. 

I’ve framed one of the embossed hearts and used a Tim Holtz arrow sticker to further draw attention to it. Die cut lettering finishes it off. 

Gail and Jo would love to see your romantic crushes (see what I did there?) so why not get your squash on during the month? There’s a prize for a random winner too!

Unusually for me there’s no stamping here so I’m linking up at Unstampabelle as well where the current challenge is an anything goes one. 

Supplies:
Hearts embossing folder (Crafts Too)
Bristol board, black, red and silver cardstock
Tim Holtz Industrial stickers
Fiskars circle punches
Small circle punch
Tim Holtz/Sizzix alphabet diesh
Fine frames circle die (Altenew)
Silver gel pen 
Pinflair glue gel


Wednesday, 7 March 2012

Seeds of Friendship

I've been playing with some delightful Chocolate Baroque florals - you can see my guest post on the CB Design Team blog here.

I used a computer generated seed packet "framework" along with the stamp. Glenda has made a pdf of the packet available to download, you'll find the link in the blog post if you'd like a quick starting point to make something similar - it's free and includes some instructions for putting the project together.

Here's the inside of the project, an insert with a fold at the bottom that slips into the stamped sleeve. You can stamp a sentiment or handwrite a message to the recipient (or both!) on this. The ribbon through the top keeps it closed as well as looking pretty.

Mine has an actual packet of flower seeds inside as a little gift but you could use it for any small, flat gift item (jewellery, for example, or it would make a good way to dress up a garden centre gift voucher).

Stamps: The Rose Tree (Chocolate Baroque)

Paper: Smooth white

Ink:
Adirondack by Ranger (Espresso)
Jenni Bowlin by Ranger (Soap Powder)

Other:
Copic markers
Prismacolor pencils
Computer and printer
Silk ribbon
Circle punch


Thanks for stopping by - do take a look at the Chocolate Baroque Design Team Blog if you get chance, there's lots of inspiration there!

Saturday, 31 May 2008

Explore your birthday!

I made this card for my Dad's birthday. I always find it a bit difficult as he doesn't have any of the hobbies that many 'guy' cards tend to get themed around. I thought this vintage feel made a good all-rounder! The old map pages from the Crafty Secrets Earthy Paper Pad combine perfectly with the Journey set to make a more masculine-looking card.

I cut a hole with a Nestability Classic oval die and put the stamped and coloured image behind it once I'd given it the faux burnt edges treatment. I also stamped the globe from the set in Antique Linen on the card base to give it a slightly more finished feel but I don't think that really shows well on the photo. Lisa Zappa's idea of stamping words onto the little ticket image works well even to express sentiments like Happy Birthday!

Supplies: Journey stamp set, Earthy paper pad, sentiment words from a HOTP set, Tim Holtz Distress inks (Antique Linen, Tea Dye, Vintage Photo, Walnut Stain), Versafine Vintage Sepia, Prismacolor pencils/OMS/stump, Nestability classic oval die, sponge.

Thanks for stopping by!

Thursday, 29 May 2008

Welcome Baby!

I love the idea that all new babies have their name and birth recorded somewhere. I know in practice it's the boring old Registry Office but isn't it lovely to think that somewhere there's a cherub who has the job of writing it all down in a big old book? I thought this little guy from the Crafty Secrets Journaling set might be doing just that so I used him to make a card to welcome a new addition to the family.

The card base was scored on the diagonal to make a quilted effect and then I stamped the little sprig from the set to make the pattern in the centre of each quilt square. I used blue thread for my stitching but you could use an ivory or beige thread to make a 'neutral' card if you don't know whether you'll be welcoming a boy or a girl.

The silk ribbon is another of my adventures in natural dyes. Believe it or not, this one was beetroot (red beets for my American visitors). I was expecting red or at least pink but I gold this pretty dark ivory/champagne colour which is perfect with Tim Holtz Antique Linen Distress ink!

Supplies: Journaling set (Clear Art Stamps by Crafty Secrets), my own design sentiment stamps, Versafine (Vintage Sepia), Tim Holtz Distress Ink (Antique Linen), scoring board, Prismacolor pencils/OMS/stump, Spica clear glitter pen, silk ribbon, sewing machine and thread, sponge.

Thanks for visiting today, much appreciated!

Friday, 16 May 2008

Feeling retro

The Heartwarming Vintage blog features a couple more of my projects today along with other great samples from some of the regular DT girls. I'm sharing a bit more detail on my projects here.

Interview vibes is intended to raise a smile from deep inside the nerves that accompany chasing down a new job! The little file folder (hand cut) has the guy's id photo clipped to the front and opens to reveal an interview checklist (computer generated).


It would be easy to personalise this project with the recipient's name - I just used some white core card cut into a strip to fit my Dymo label maker and then sanded lightly to reveal the raised lettering. The whole card front is covered with a single piece of paper, it just has sponged ink over the lower part to darken it a little before overstamping with the smart brogue shoes.

Supplies: Favorite Fellas (Clear Art Stamps by Crafty Secrets), Earthy Paper Pad (Crafty Secrets), Prismacolor pencils/OMS/stump, Tim Holtz Distress Ink Tea Dye and Walnut Stain,(to sponge the dark horizontal strip), Brilliance Graphite Black, square antique copper brad, chalk, paper clip, stapler, Dymo label maker, DCWV white core card, sandpaper

Handful of Love continues the retro feel. This lady from the tea and coffee set definitely looked like she was expecting something to drop in to that outstretched hand and I thought a little shower of hearts might be a nice thing to receive!

I don't have scallop Nestabilities which would have been ideal here so I punched a bunch of small circles and stuck them behind the main image panel that already had a narrow mat of the same paper.

Supplies: Tea & Coffee, Mini Memories and Sweet Kids stamp sets (all Clear Art Stamps by Crafty Secrets), Radiant paper pad, Sweet Chips die cut shapes, Prismacolor pencils/OMS/stump, Tim Holtz Distress inks (Fired Brick and Walnut Stain), small circle punch, red laid paper, grosgrain ribbon, silver thread, enamel heart charm all from stash (unknown maker).

Thanks for visiting today, I hope you enjoyed the little step back in time!

Tuesday, 13 May 2008

Ten Years Ago

This is a project that Sandy has featured on the Heartwarming Vintage blog but I thought I'd tell you a little bit more about it here since I have less to fit in to a post than she does!

We recently celebrated our tenth wedding anniversary and although we don't usually make a big thing of anniversaries, we thought we'd push the boat out a bit since it was a round number. We had a couple of days away in a nice hotel and I thought I'd make something a bit more 'special' than a regular card (as ever, you can click through for a closer view).


When Sandy sent me my lovely Guest Designer package, I looked at the Rosy Wishes set and thought "Eek, what am I going to do with that?" Guess which set I reached for when I sat down to make my first project? Yup, Rosy Wishes! I wanted to use a photograph of me on my wedding day (I joke that it's to remind DH how little I've changed in a decade - lol!) and the spray of roses stamp seemed like a perfect tie-in with my bouquet. I stamped it once and then inked up only the top part of it and stamped again to extend a little further up the side of the chipboard heart. As my bouquet was cream roses and ivy, I coloured the flowers with a cream Prismacolour pencil and just shaded a little with a light beige. I painted the ribbons with a gold pearlescent watercolour.

I sponged a couple of shades of green ink over the heart and then added marble 'veining' with a couple of gel pens. The photo was cut with a Nestability die and I made the mat for it by using the outer edge of the same die as a guide for a scalpel. Ivory silk ribbon provided a touch of luxury for the hanging loop and one of the small shapes from the Frame It set provided a delicate edging pattern.

I've never used cardstock stickers before and I have to say I was impressed. I wanted the holes where the ribbon is threaded through to look a bit more 'finished' so I chose a couple of eyelet stickers - so easy to handle and get properly placed and they're die-cut on the sheet so they're ready to just peel and go, there's no fiddling about trying to punch out holes in appropriate places or anything.

Supplies: Sweet Chips heart album and small die cut frame; Rosy Wishes, Sexy Little Numbers and Frame It Clear Art Stamps; Brass and Cream Hardware Stickers (Heartwarming Vintage); Tim Holtz Distress ink - Shabby Shutters and Peeled Paint; Versafine Vintage Sepia; copper, gold and white gel pens; Nestability Classic Oval dies; 1" silk ribbon; Versamark and gold lustre powder; pearlescent watercolour; Prismacolor pencils/OMS/stump

Thanks for your visit today, do let me know what you think if you have a moment to leave me a comment, I do love to hear from my visitors!

Saturday, 10 May 2008

Cherry Sweet

OK, I'll admit to the fact that I usually prefer red rubber stamps. I'm coming round to the joys of high-quality photopolymer though and among the benefits (exact placement being the obvious one) there's one sneaky little advantage I love:

All together now... "Bend me, shape me, anyway you want me..."

You just can't do it with traditional rubber - if it comes straight, you use it straight, end of story. Here's a little something that I think turned out cute (click on the pic for a better view if you want it):


A jar of something homemade is always a nice gift but it’s even nicer if you dress it up a little. See what I did here? I took the cherry scalloped border from the Kitchen Classics set and curved it onto a large block then stamped three times to make a complete circle and trimmed round the scallops. I chose mulberry paper as it’s soft enough to ‘drape’ a little over the lid and make a pretty frill.

A stamped label looks sweet and using a sticky mailing label means it's a quick and easy fit on the jar.

A linguistic note: As I’m British it’s ‘jam’ to me, for my visitors from North America ‘jelly’ would fit on the label just as well :o)

Supplies: Kitchen Classics and Adore alphabet (Crafty Secrets Clear Art Stamps), Brilliance Graphite Black ink, Prismacolor pencils/OMS/stump, gingham ribbon (Bazzill), sticky mailing label, white mulberry paper

Thanks for stopping by, hope your day proves to be a bowl of cherries :o)

Wednesday, 7 May 2008

Excitement in the land of Ambrosia & Iron

How excited am I today? VERY excited! In fact, so excited that I’m going to do this in three parts: news and project, blog hits and giveaway…

I’m excited, Part One: I am absolutely thrilled to tell you that Sandy Redburn invited me to be Guest Designer for Crafty Secrets this month. Wow! Did I mention I’m thrilled ;o) I’ll be sharing Crafty Secrets projects with you on the blog during May and Sandy will have some on the Heartwarming Vintage blog, too. Here’s one to get us going...


This came together quickly because the paper (from the Crafty Secrets Radiant pad) does most of the work here. I just added a stamped sentiment from the Sweet Kids set and the ribbon/lace/stitching. The girls on the Bubbly Funk forum may remember my recent exploits in dying silk ribbon – this is the first outing for my natural dye experiments! These were dyed with blackberries; the paler one stayed in the dye bath for an hour or two; the darker one stayed in overnight.

Supplies: Radiant Paper Pad and Sweet Kids Clear Art Stamps (both Crafty Secrets), vintage lace edging, 1” silk ribbon, Clearsnap Deep Green Fluid Chalk ink, sewing machine and thread.

I’m excited, Part Two: My blog has just gone through the 10,000 visits mark since I installed a counter on it. Wow! Thank you very much to all my visitors, new and old, regular and occasional – it’s only worth doing if people enjoy their visits and the fact that so many of you keep coming back really means a lot to me: thank you!

I’m excited, Part Three: add together One and Two and I think a celebration is in order so I have blog candy! Crafty Secrets just released four booklets combining vintage images and journalling spots so they’re great for scrapping as well as cards or altered projects.


I have a full set of four booklets to give away, so the winner will get Homemade, Summertime, Childhood and Birds & Botanicals to play with. You can see them here (click on each booklet to get a more detailed view of them).

So, what do you have to do to win? Firstly, this is open only to UK and European players so that we get to spread the fun a little. Sorry if you’re not in those locations but hopefully you’ll find it easier than us to get hold of Crafty Secrets stuff and Sandy has details of other giveaways on the Crafty Secrets blog that are open to everyone so check those out if your location means you’re not eligible for my draw.

Looking at the little Pierrot in the Childhood booklet got me thinking about the dressing-up box most of us had as kids. So, if you’re in the UK or Europe and would like to win the booklets, just leave a comment on this post to tell me your favourite memory of dressing up in costume as a kid. Make sure there’s a link to your blog or other way to contact you so I can let you know if you won!

Please leave your comment by midnight (GMT) on Wednesday 14th May to go into the virtual hat and I will announce a winner on Thursday 15th. Of course I’d love to hear from you even if you’re not entering the draw, so please do say “Hi!” (you could put ‘no candy’ in your comment if you want to make my life easy).

My favourite? Probably the cone shaped Christmas tree hat, decorated with a spiralled fringe of green crepe paper and real tiny glass baubles! The lion with full mane, eyebrow pencil whiskers and swishy tail (thoughtfully attached with a large press stud so there would be no embarrassing mishaps in the event of a naughty boy pulling my tail – thanks Mum!) runs a close second, though ;o)

Thanks for your visit today, hope you had some fun!

Excitement in the land of Ambrosia & Iron

How excited am I today? VERY excited! In fact, so excited that I’m going to do this in three parts: news and project, blog hits and giveaway…

I’m excited, Part One: I am absolutely thrilled to tell you that Sandy Redburn invited me to be Guest Designer for Crafty Secrets this month. Wow! Did I mention I’m thrilled ;o) I’ll be sharing Crafty Secrets projects with you on the blog during May and Sandy will have some on the Heartwarming Vintage blog, too. Here’s one to get us going...


This came together quickly because the paper (from the Crafty Secrets Radiant pad) does most of the work here. I just added a stamped sentiment from the Sweet Kids set and the ribbon/lace/stitching. The girls on the Bubbly Funk forum may remember my recent exploits in dying silk ribbon – this is the first outing for my natural dye experiments! These were dyed with blackberries; the paler one stayed in the dye bath for an hour or two; the darker one stayed in overnight.

Supplies: Radiant Paper Pad and Sweet Kids Clear Art Stamps (both Crafty Secrets), vintage lace edging, 1” silk ribbon, Clearsnap Deep Green Fluid Chalk ink, sewing machine and thread.

I’m excited, Part Two: My blog has just gone through the 10,000 visits mark since I installed a counter on it. Wow! Thank you very much to all my visitors, new and old, regular and occasional – it’s only worth doing if people enjoy their visits and the fact that so many of you keep coming back really means a lot to me: thank you!

I’m excited, Part Three: add together One and Two and I think a celebration is in order so I have blog candy! Crafty Secrets just released four booklets combining vintage images and journalling spots so they’re great for scrapping as well as cards or altered projects.


I have a full set of four booklets to give away, so the winner will get Homemade, Summertime, Childhood and Birds & Botanicals to play with. You can see them here (click on each booklet to get a more detailed view of them).

So, what do you have to do to win? Firstly, this is open only to UK and European players so that we get to spread the fun a little. Sorry if you’re not in those locations but hopefully you’ll find it easier than us to get hold of Crafty Secrets stuff and Sandy has details of other giveaways on the Crafty Secrets blog that are open to everyone so check those out if your location means you’re not eligible for my draw.

Looking at the little Pierrot in the Childhood booklet got me thinking about the dressing-up box most of us had as kids. So, if you’re in the UK or Europe and would like to win the booklets, just leave a comment on this post to tell me your favourite memory of dressing up as a kid. Make sure there’s a link to your blog or other way to contact you so I can let you know if you won!

Please leave your comment by midnight (GMT) on Wednesday 14th May to go into the virtual hat and I will announce a winner on Thursday 15th. Of course I’d love to hear from you even if you’re not entering the draw, so please do say “Hi!” (you could put ‘no candy’ in your comment if you want to make my life easy).

My favourite? Probably the cone shaped Christmas tree hat, decorated with a spiralled fringe of green crepe paper and real tiny glass baubles! The lion with full mane, eyebrow pencil whiskers and swishy tail (thoughtfully attached with a large press stud so there would be no embarrassing mishaps in the event of a naughty boy pulling my tail – thanks Mum!) runs a close second, though ;o)

Thanks for your visit today, hope you had some fun!