Showing posts with label scrapling. Show all posts

Friday, 13 August 2021

Very superstitious

Hello, my turn to set the challenge over at Daring Cardmakers this week and as it’s Friday the 13th I thought we’d take inspiration from superstitions this time. No need to try to represent the superstition itself (although you could if that's the way the muse takes you!), just pick an element to use on your card (see the blog for more details!).

Spoiled for choice I considered shoes (don't put new shoes on the table), a monkey with a banana (don't take bananas on board a boat) and various others before settling on a very old superstition - apparently women in Ancient Britain often carried an acorn in a pocket in the belief it would keep them looking young. A lot cheaper than all the anti-aging products around these days! 

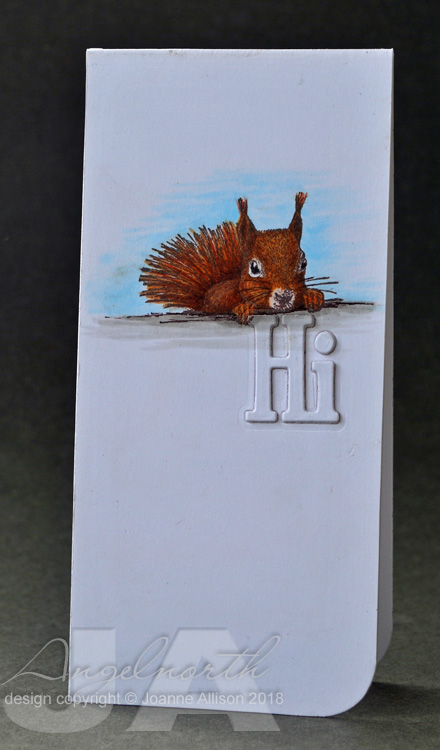
I chose to make a clean and simple scrapling and to throw the acorns into the spotlight a bit more, I stamped a second image on a scrap of cardstock, cut out just the acorns and used a bit of gel glue for some lift.  

As I chose an older stamp I’m playing along at Retro Rubber too as there’s an anything goes theme for the current challenge

My teamies have been knocking on wood, encountering black cats, umbrellas and horseshoes - check out the blog for more superstitious inspiration!

Stamps:
Fall Harvest (Cornish Heritage Farms, no longer with us - set dated 2009)
Say It All (Hero Arts, retired)

Paper:
Bristol board

Ink:
Versafine by Tsukineko (Vintage Sepia)
Adirondack dye ink by Ranger (Espresso)

Other:
Copic markers 
Coloured pencils
Pinflair glue gel
Corner Chomper

Thanks for stopping by, I hope life is being kind to you.


Tuesday, 30 July 2019

Tic tac toe at Retro Rubber

I'm Guest Designing for Retro Rubber for the challenge that has just gone live as this dragonfly card was chosen as a Top Pick - thanks Retro Rubber! It's one of their fun tic tac toe boards this time:


I chose a diagonal line and used gems, texture paste and heat embossing to make a little scrapling. I'm trying to get going on some Christmas cards since I've not been building up a stock over the year so far!

I started with a scrapling base of kraft cardstock and added some pearlescent texture paste through a stencil that's cut with a Spellbinder die. While that was drying, I stamped the ornament with a light ink and used Copics to colour it, then overstamped with Versamark and heat embossed with gold. With this image I find the little dots are small enough that if I try to Copic colour after embossing, the detail gets lost as the alcohol ink colours the embossing too. A Misti makes it easy to do it the other way though!

Stamps:
Holiday Ornaments (Waltzingmouse Stamps, no longer with us - set is dated 2011)

Paper:
Kraft
Bristol board

Ink:
Tim Holtz Distress ink (Antique Linen, Vintage Photo)
Versamark
Brilliance by Tsukineko (Pearlescent Chocolate)

Other:
Copic markers
Detail gold embossing powder
Silver thread
Iridescent Paste by Maimeri
Stencil cut with Fancy Lattice die (Spellbinder)
Nail art gems
Corner Chomper
Misti

Thanks for stopping by!

Friday, 26 April 2019

Up, up and away

Miri has set today's challenge over at Daring Cardmakers  - she'd like us to take off with lots of balloons this week!

I have a clean and simple scrapling to offer - who gets the movie reference?!

Miri may have been thinking  about "99 Red Balloons" but I was thinking about "Up". Ellie may only be in the first 10 minutes or so but she's the beating heart of the film so this is a wee homage to her as well as Carl. Just remember:

"Adventure is out there!"

I set out to make a single layer card by cutting a stencil (die cut circle with freehand bobbly bit for the knot) and inking inside the aperture. I then dropped several things in the white space - sigh! So I cut out the inky balloon with scissors and added it to a scrapling base with a doodled string and a word selectively inked from a longer sentiment.

Supplies:
Spellbinder circles dies
Tim Holtz Distress Oxide (Carved Pumpkin)
Tim Holtz Distress ink (Spiced Marmalade, Barn Door)
Versafine (Onyx Black)
Sentiment from Essential Messages (Hero Arts)
Funeline marker
Corner Chomper 

Thanks for stopping by!

Friday, 8 February 2019

Christmas already?

It's Miri's turn to set us a challenge over at Daring Cardmakers this week and she's asking us to use candles.

The only candle image I could think of in my stash was in a lovely set which is definitely a Chistmas set and my brain failed to come up with an alternative use for it so it's Christmas in February! Still, making some cards throughout the year is a good thing, reduces the panic come November!

I picked up a scrapling from the pile and made a wee card with just stamps and ink. I did add a tiny bit of shading to the leaves and berries with a couple of markers but that's as exotic as the supply list got!

Stamps:
Bright Season (Waltzingmouse Stamps, no longer with us)
Woodgrain background (Darkroom Door)
Sentiment pieced together from Festive Foliage (Waltingmouse Stamps, now available at Gina K) and Peace Stamp & Cut (Hero arts)

Ink:
Versafine by Tsukineko (Onyx Black, Olympia Green)
Memento Luxe by Tsukineko (Love Letter)
Adirondack dye ink by Ranger (Sunshine Yellow)
Tim Holtz Distress ink by Ranger (Antique Linen, Vintage Photo)

Other:
Corner Chomper 
Copic markers

Thanks for stopping by!

Friday, 25 January 2019

Colourful!

Ruth has set today's challenge over at Daring Cardmakers - she'd like to see lots of colour on our projects this week.

I'm afraid my week went rather pear-shaped so I decided I'd share this rainbow scrapling I made for a Splitcoast event last year since rainbows are about as colourful as it gets!

Stamps:
Sentiment from Wild Mushrooms by Power Poppy

Paper:
Bristol board
Smooth black

Ink:
Versafine by Tsukineko (Onyx Black)

Other:
Umbrella Man die cut (Tim Holtz/Sizzix)
Timeworks mask (Tim Holtz/Alterations)
Pan Pastels and chalks to make rainbow
Spectrafix Degas fixative
Black fineliner
Corner Chomper
Black Enamel Accents by Ranger
Charcoal pencil


Thanks for stopping by!

Saturday, 3 November 2018

November elements

Alarmingly we're into another month already! As Christmas is fast approaching, our challenges at Daring Cardmakers are starting to have a bit of a festive theme. The mood board for this month could lend itself to other things though if you don’t celebrate Christmas or are still in avoidance mode!

As usual with a “elemental” challenge, just chose at least three elements from the inspiration picture to kickstart your project. I chose the silver ribbed bauble,  NOEL sentiment on separate tiles and the colour scheme. I used a piece from my scraplings pile for the card base.

The bauble is embossed with silver powder on silver mirror card - I think it turned out with quite a stylish look.

Stamps:
Holiday Ornaments (Waltzingmouse Stamps, no longer with us)

Paper:
Bristol board 
Silver mirror card

Ink:
Versafine by Tsukineko (Onyx Black)
Tim Holtz Distress ink by Ranger (Pumice Stone)
Versamark by Tsukineko 

Other:
Silver detail embossing powder
Square Nestabilities by Spellbinder
Silver gel pen
Corner Chomper 

Here’s our inspiration this month:


We’d love to see which elements inspire you!

Friday, 27 July 2018

Hello and welcome!

It’s Svenja’s turn to challenge us over at Daring Cardmakers this week and she’d like us to focus on welcomes - a new baby, new colleague, new neighbour etc.

I’ve gone clean and simple with a scrapling (I’m determined to make a dent on the pile of scrapling-sized trimmings I have!). We live right on the edge of an area that still has red squirrels even though the greys are making inroads into the territory. We’re encouraged to report sightings of greys and one of our neighbours is a squirrel warden!

All of which made this stamp a perfect choice for a card to say “hello, welcome to the neighbourhood”! I’m sure he’s a red squirrel as he has those lovely little tufty bits on his ears and the greys don’t have those! Sadly I don’t have a die to cut the word welcome so I settled for stamping it on the inside.

Stamps:
Squirrel by Carabelle Studio

Paper:
Bristol board

Ink:
Brilliance by Tsukineko (Pearlescent Chocolate)

Other:
Copic markers
Black fineliner 
Phrases 2 dies by Spellbinder
Corner Chomper

Thanks for stopping by!

Friday, 22 June 2018

Wonderful world

Kathy has set the challenge for us at Daring Cardmakers this week - she'd like us to be inspired by the words of the song What a Wonderful World - pop over to the blog to see all the lyrics!

I've done a super-quick scrapling this week with inspiration from the blue sky and green trees mentioned in the song. I inked the trunk in brown and the foliage in green before stamping then added some Distress inks as watercolours - it really was a super-quick process since you can randomly dab in a couple of shades of green and get a lovely tree canopy in full summer leaf!

I die cut the word from the card front as well as a couple of extras from scrap card for an integrated look.

Stamps:
Lovely as a Tree (Stampin' Up)

Paper:
Bristol board

Ink:
Brilliance by Tsukineko (Pearlescent Ivy, Coffee Bean)
Tim Holtz Distress ink by Ranger (Shabby Shutters, Peeled Paint, Vintage Photo, Walnut Stain)

Other:
Hello die (Waltingmouse Stamps, no longer with us)
Zig Clean Colour marker (light blue)
Corner Chomper

Thanks for stopping by!

Friday, 23 February 2018

Stencilled Scrapling

Svenja has set the challenge for this week's Daring Cardmakers - she'd like to see stencils and shades of green on our projects. I've made a scrapling in which the stencil took a bit more of a supporting role that my original plan but I find you can't always dictate what happens at the craft table!

I started with a piece of mixed media paper with Juniper ink sptritzed and pooled on it that was left over from a previous project and built up from there, stencilling and stamping over the top. A pretty die cut butterfly, a spatter of Enamel Accents and pen dots and some messy silver thread and I called it done - I seem to be having a problem including sentiments on things at the moment!

Supplies:
Mini Butterfly Duo dies by Time Holtz/Sizzix
Wings stamp set by Darkroom Door
Bamboo Mixed Media paper by Hannemuhl
Scraps of black and orange cardstock
Juniper Adinrodack dye ink by Ranger
Bundled Sage and Peeled Paint Distress ink by Ranger
Cressida stencil by Memory Box
Copic markers
Clear wink of Stella pen
Black Engamel Accents by Ranger
Fine line marker
Silver thread
Corner Chomper

Thanks for stopping by!

Wednesday, 1 April 2015

Altered Grunge Paste!

The current theme at PaperArtsy is "altered Grunge Paste" - Leandra's hoping we'll try out something other than simply using paste through a stencil.

I was super-lucky and Random pulled my name out of the virtual hat on the last challenge so I had a lovely time wandering through PaperArtsy's online shop, choosing my prize goodies. A big thank you to Leandra and to Darcy for organising it.

Grunge Paste sounded intriguing - a bit different to most texture pastes - and so I popped a tub in my prize basket. Hearing Leandra describe it as "almost clay-like" had me wondering whether a DIY substitute for StampBord might be doable with Grunge Paste taking the role of that clay layer on the board.

I cut an inchie-plus (1.5" square) from scrap mountboard and "buttered" it with a layer of Grunge Paste. Once it was thoroughly dry, I used a sanding block to give me a silky-smooth surface. As you really want colour that doesn't soak in, I sponged Stazon over the top and then stamped the daisy heads (also part of my prize package so another thank you!) using Brilliance. Then the moment of truth - adding those scraped back white highlights with a pin.

I think it looks very much like Stampbord but, if you want to mail it, has the advantage of being lighter and thinner and of course you could do any shape you wanted as long as you could cut it from a substrate with enough rigidity to stand up to the Grunge Paste layer.

The finished square got a super-simple mounting on a scrapling with just a bit of doodling to frame it.

Stamps:
Hot Pick 1203 by PaperArtsy
Sentiment from an ancient HOTP set (one of my first ever stamping purchases!)

Paper:
Off-white laid texture cardstock
Scrap mountboard

Ink:
Teal Stazon
Graphite Black Brilliance

Other:
Grunge Paste by Paper Artsy
Cuttlebug square die
Corner Chomper
Copic 0.3 Multiliner

Thanks for stopping by!


Thursday, 15 May 2014

Playing with words

I decided I needed a little play with no real purpose in mind this morning. I did use a couple of challenges as a direction for play time but this is a project with no occasion or recipient in mind.

This week's Mixability challenge on Splitcoast Stampers is to "take it away" - do something to show what's underneath a top layer. Indigo Blu's Challenge 15 is "words are all you need".

This little scrapling (the piece left over when you trim a sheet of cardstock to make a square card) started off with a piece of old book page which was spritzed with Dylusions. I added a layer of Mod Podge and once that was dry, a layer of Fresco Finish acrylic paint. I laid a stencil over the top of the dry paint and used a combination of rubbing alcohol, baby wipe and elbow grease to remove the paint and let the inky text show through. I found this technique didn't work without a clear layer (the Mod Podge), I just ended up rubbing away the paper if I rubbed hard enough to remove the paint.

I doodled rough circles round the exposed areas then added a single word, part of a definition and random snippets of script writing with Brilliance ink and finished with a double layered punched star for a bit more drama.

I had fun doing something away from my "norm"!

Stamps: Sarah's Choice by Indigo Blu

Paper: old book page

Ink: Brilliance by Tsukineko (Graphite Black)

Other:
Dylusions ink spray (Vibrant Turquoise)
Fresco Finish acrylic paint by Paper Arsty (Mermaid)
Mod Podge Matt
Random Circles mask by Tando Creative
Fineliner pen
Fiskars squeeze punches (star medium and large)

Thanks for stopping by!

Monday, 21 June 2010

All things considered ... it's Week Three of the Fling!

Welcome to Week Three of CHF's summer fling! Full details of the fling are here if you're not sure what I'm talking about! We're focusing on the All Things Considered line of stamps this week. Now, as their name might suggest, they're perfect for ATC projects but they're versatile enough for all kinds of other stuff too! If you stopped by on the Be Creative blog earlier, you'll have seen one card I made with the Key Elements set already. I thought it would be fun to do a second card using the same set in a totally contrasting style! (Note for my regular visitors - you know how much I struggle with patterned paper: if you want proof that I'm tackling the phobia, the card on the Be Creative blog is probably as good as it's going to get!) This is a scrapling (a card made from the bit you trim off a standard size sheet when you make a square card) and I've kept it clean and simple. I think this would make a great new home card, perhaps for somebody getting his first bachelor pad! I stamped the key onto a 1" strip and then cut it up to make three inchies. I sponged around the edges and then stuck them to some black card stock to make a narrow border. I stamped the text stamp over the key and then stamped it again on the base card, using a stamp positioner so that everything would line up when I stuck the key panel in place. Stamps (Cornish Heritage Farms): Key Elements (All Things Considered line) Paper: Smooth white Simply Linen black Ink: Brilliance by Tsukineko (Graphite Black) Tim Holtz Distress ink by Ranger (Vintage Photo)
So, the low down on this week's Fling and its blog hop...
  • all stamp sets in the All Things Considered line are 25% off this week (ends Thursday at midnight)
  • make sure to leave comments for the blog hop girls by Thursday (24 June 2010) at midnight EST to have a chance at the CHF gift certificate prizes - the more blogs you comment on, the better your chances!
  • create along with us if you have All Things Considered stamps and upload to this week's special gallery (by Thursday at midnight) to be in with a chance of winning the Design Team Favourite prize this week (a stamp or stamp set of your choice up to a value of $16.99)
  • check the Be Creative Blog on Friday to see if you won
  • if you get lost along the way, go back to the beginning (Be Creative Blog) for the full list of hoppers.
Leave a comment here and then Jennifer is your next stop along the hop - have fun!!

Thursday, 29 April 2010

My first scrapling!

I've never got round to making a "scrapling" so I thought it was about time I had a go. A what, some of you may be asking. A scrapling is just a little card made from the bit left over when you trim a standard sheet of cardstock to make a square card.

A very quick and simple one layer design - no colouring in! I used three inks sponged through a hole cut with a Nestie in a piece of scrap paper to get the "glow", stamped the hibiscus with the mask still in place and then removed the mask to stamp the dragonfly.
Two scored lines and a crystal brad add a touch of texture to finish off.

I love the bold, graphic look of this hibiscus - this set is actually made up of the same two images as the "Emerging Dragonfly" set but the sizes are reversed so the flower is the large stamp in this set where it's inchie-sized in the earlier one.

Stamps (Cornish Heritage Farms):
Emerging Hibiscus (Sara England line)

Paper:
Smooth white

Ink:
Tim Holtz Distress ink by Ranger (Mustard Seed, Wild Honey, Spiced Marmalade)
Versafine by Tsukineko (Onyx Black)

Other:
Classic Circle Nestabilities by Spellbinder
Crystal brad by Making Memories
Scor-It


Thanks for stopping by!