Showing posts with label DecoArt Glamour Dust. Show all posts

Friday, 2 August 2019

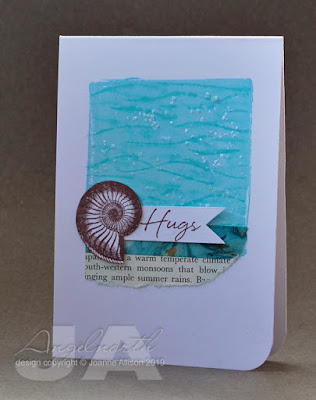
August elements

Kathy has chosen a lovely inspiration mood board for the August “elemental” challenge over at Daring Cardmakers. As ever, just chose at least three elements from the picture to kickstart your project.

I chose a shell, waves, random sparkle, book text, turquoise blue and a single word in a handwritten style.

I used the square from the Gel Press Petites to add brayered turquoise paint to a card base. I then sketched lines with a Spica glitter pen on the gel square, spritzed with water and pressed it over the paint. Just take care not to press too hard with the pen if you do this so the nib doesn’t damage the surface of the gel. I used the little white imperfections in the paint impression to guide where I put dots of Glossy Accents and poured on some clear glitter. As usual with a still photo the glitter doesn’t show up too well but it’s there and it’s pretty in real life!

Stamps:
Antique Engravings and Say It All (Hero Arts, both retired I believe)

Paper:
Bristol board 
Old book page

Ink:
Brilliance by Tsukineko (Pearlescent Chocolate)

Other:
Gel Press Petites
Fresco Finish acrylic paint by PaperArtsy (Mermaid)
Spica glitter pen (Turquoise)
Glossy Accents
Glamour Dust by DecoArt (Crystal)
Washi tape
Corner Chomper 

Here's the inspiration picture if you’d like to join in and didn’t arrive by way of the DCM blog!


Thanks for stopping by!

Friday, 26 October 2018

All that glitters...

Svenja has set the challenge for us over at Daring Cardmakers this week and she'd like to see us sparkle - add some glitter! Any kind of glitter is fine!

I used some glitter cardstock and some Glamour Dust on my slightly minimalist-looking Christmas card! The loose glittter is on lines of PVA glue to make some sparkly ground for the deer.

I sponged the edge of the moon with some blue ink for a bit of depth, I think that's just about visible on the photo. I used my cereal packet "diffuser" to emboss the card and leave a smooth area at bottom left for the sentiment.

Stamps:
Noel (mine is the original Waltingmouse Stamps set, the same is now available from Gina K)

Paper:
Bristol board

Ink:
Tim Holtz Distress ink by Ranger (Blueprint Sketch)
Versfine by Tsukineko (Onyx Black)

Other:
Reindeer Flight die (Time Holtz/Sizzix)
Confetti die (Mama Elephant)
Circle Nestabilities (Spellbinder)
Softly Falling embossing folder (Stampin' Up!)
Corner Chomper

Thanks for stopping by!

Friday, 9 February 2018

Cosy home

Miri has set the challenge for us this week at Daring Cardmakers and she wants to see cosy homes featured on our cards.


There really is an explanation for a Christmas card in February! I’m trying to play along with the Dirty Dozen Christmas challenge at Splitcoast Stampers this year - the idea is to make at least one card per month to a theme set by our hostesses to avoid the mad dash at the end of the year. If you’re a Fan Club member at Splitcoast why not come and join us?

It seems I have a severe shortage of anything house-related in my craft room so when I thought of this stamp for Miri’s DCM theme, I was delighted to find a way to use it, even though it’s a bit unseasonal (and means I must apologise to Kathy, who typically shudders at the mention of making Christmas cards before about September!).

The central image was stamped on a separate piece of card stock, coloured and cut out then stuck on with some gel glue for a bit of lift - it means the card is still flat enough for regular postage but has a bit of something special about it. There's lots of Glamour Dust on the snow drifts and roofs too but as ever with glitter that's a bit difficult to see in the photo, I think.

Stamps:
Snowy Postcard by Stampendous
Grunge Flakes by Tim Holtz/Stampers Anonymous

Paper:
Bristol board

Ink:
Brilliance by Tsukineko (Graphite Black)
Tim Holtz Distress ink by Ranger (Antique Linen, Vintage Photo, Walnut Stain)

Other:
Copic markers
Clear Wink of Stella pen
White Posca paint pen
Pinflair glue gel
Glamour Dust by DecoArt (Crystal)

Thanks for stopping by!

Friday, 10 November 2017

Warm woollen mittens

This week's challenge in the run up to Christmas for Daring Cardmakers is "warm woollen mittens" - feature some winter clothing on your creation. It could be mittens, hats, gloves, scarves, boots...

My snowman is wearing a scarf and although his hat may be more for show than warmth his little birdy companion has gone for the full woolly pompom affair.

This is a hybrid card - the snowman is a digi (printed with a laser printer and coloured with Copics), the snowflakes and part of the sentiment are stamped. The die cut "merry" was covered in glitter and then given a bit of an ombre effect with Copics.

Stamps:
Top of the Morning Snowman (digi by Whimsy Stamps, Crissy Armstrong Collection)
Merry Stamp & Cut (Hero Arts)
Flurries (waltzingmouse Stamps, no longer with us)

Paper:
Smooth white
Kraft

Ink: 
Brilliance by Tsukineko (Graphite Black)
Tim Holtz Distress ink by Ranger (Tumbled Glass)

Other:
Copic markers
Glamour Dust by DecoArt (Crystal)
Sewing machine and thread
Posca paint pen (white)

Thanks for stopping by!

Friday, 12 May 2017

All that glitters...

Shabneez is setting this week's challenge at Daring Cardmakers and she'd like us to use plenty of glitter - the only catch is that it can't be gold!

I decided to go all-out with the glitter and do a whole sparkly panel. I stamped the stylised flowers first and then covered the whole piece with double sided tape sheet and smothered it with Glamour Dust. Both the tape and the glitter are transparent so the stamping shows through.

If you burnish the glitter into the tape, you get a sort of velvety-feeling surface. Then, just because I haven't played with my air brush and Copics for ages, I sprayed graduated colour over the sparkle. I did then use a black Copic to dot over the flower heads, just to boost the contrast.

Given that much glitter, I decided a simple treatment would be best so the piece just got a narrow black mat and a die cut sentiment.

Stamps:
Stylised Flowers by Indigo Blu

Ink: Brilliance by Tsukineko (Graphite Black)

Paper: smooth white

Other:
Double sided tape sheet
Crystal Glamour Dust by Deco Art
Copic markers
Airbrush and compressor
Hello die by Waltzingmouse stamps (no longer with us)

Thanks for stopping by!

Friday, 14 November 2014

Scandi bedtime story!

I'm playing along with the Waltzingmouse Stamps Pajama Party this month and I've even managed more than one challenge!

The first challenge is "Scandi tags" and although mine kind of evolved to be a bit more complex than I originally intended I think it probably still qualifies! I toyed with putting white faux stitching around the edge of the heart but decided that was yet more complexity so I skipped it in the end!

I reckon if you moved the button and snowflake to be central and punched a wee hole at the top of the heart that bit would make pretty Scandinavian-style hanging decorations for the tree, too!

Supplies from Waltzingmouse:
Stitched Tags dies
My Heart dies
Snowflake #2 die
Folk art medallion stamp set (for sentiment)
Offbeat backgrounds stamp set (chequerboard pattern)

Other supplies:
Adirondack Red Pepper ink
Wooden button
White crochet thread

The final challenge of a Pajama Party is always a "bedtime story" sketch and as I've been meaning to play with these big, ornately scripted Christmas sentiments and not getting round to it I leapt on the sketch's large central oval as the perfect kickstart.

Claire has cut files and dies that match the stamps in the Festive Foliage set but I quite like cutting out so I took the good old-fashioned scissor route. The design is flat enough not to need extra postage and dies or cut files would make mass production doable - hand cutting would mean you were a slave to cutting out for many evenings, I would think!

I gave myself a nightmare to photograph but die cutting the snowflakes from double-sided tape sheet and rubbing on Crystal glitter makes a really pretty, festive touch in real life. The dots are done with a regular hole punch with the tape/glitter and the frosty edge of the oval is just PVA glue applied with a paintbrush to hold the glitter.

Supplies from Waltzingmouse:
Tis the Season stamp set
Festive Foliage stamp set
Snowflake #2 die

Other supplies:
Decoart Glamour Dust glitter - Crystal
Detail gold embossing powder
Versamark
Distress ink - Barn Door
Versafine ink - Olympia Green
Double-sided tape sheet
Corner Chomper

Thanks for stopping by!


Tuesday, 9 April 2013

Tipsy glitter cover girl!

I'm blowing my own trumpet just a little today - I've just got back from a couple of weeks in Italy and find myself a cover girl for the first time!


I have a step-by-step article in the May issue  of Craft Stamper on using glitter and alcohol markers (hence "Tipsy Glitter") and one of the three cards described in the article is featured on the cover. I'm quite excited!

I don't use a lot of glitter in my crafting and this is a good way to make a single colour stretch much further!

Hoping to get  back into some crafting in the next week or so but you know how it is when you've just got back from a holiday and feel you have no idea which way is up!

Stamps you can see on this cover card are
Butterflies from Antique Engravings (Hero Arts)
Sentiment from Truly Appreciated (Hero Arts)

Thanks for stopping by!
Sunday, 2 October 2011

Glittering celebration

I just managed to squeak in an entry to the "Stash Buster" competition on UK Stampers. The idea of the series of challenges is to use items from your stash that are often overlooked and the first item we were asked to use was glitter.

I fall fairly and squarely into the category of people who rarely remember to use glitter. In fact I don't have a big stash of it as I don't get sucked in to buying it but the few colours I have are mostly ages old!

I bought this fun Bubble Border stamp a while ago and haven't got round to inking it up so I thought I'd bring it in to play with this challenge. I used a Quickie glue pen and added turquoise ultrafine glitter and Glamour Dust to some circles (some coloured in first to give extra intesity to the glitter colour).

The sentiment is from a fun set which has some key words in the large, eleborate font and then lots of little additional words and phrases in the small, plain font so you can build your own sentiment.

Stamps:
Bubble Border (Lost Coast Designs)
Say it Loud (Waltzingmouse Stamps)

Paper: Smooth white

Ink: Versafine by Tsukineko (Deep Lagoon)

Other:
Memento markers by Tsukineko (Summer Sky, Bermuda Blue)
Turquoise ultrafine glitter
Glamour Dust
Quickie glue pen
Corner Chomper by We R Memory Keepers


Thanks for stopping by!

Tuesday, 16 August 2011

Christmas ornament

I'm hosting this week's challenge in the Crafty Secrets member forum at Splitcoast Stampers and I'm asking people to use squares in their projects.

I've opted to use the square as my card base and added another to my stash of Christmas cards.

This is one of those projects that looks better in real life than you can manage to capture with a photo! The ornament is coated in glitter above and below the banner area and the little gems to represent lights on the tree really do glow if you catch the sun right! Those are things that tend to show with movement I guess and a still photo leaves it to your imagination to fill in!

I like to do "all one stamp set" projects sometimes rather than pulling in stuff from several sets and/or makers - it makes you focus on how versatile the elements of a set can be! I used four of the stamps in the set here - the elegant ornament, the separate sentiment banner that fits on to it, the snowflake for subtle background pattern and the fir sprig to build up the overhanging branch at the top.

Stamps:
Christmas Joy (Crafty Secrets)

Paper:
Cryogen white
Dark red
Gold

Ink:
Versamark by Tsukineko
Versafine by Tsukineko (Olympia Green)
Tim Holtz Distress ink by Ranger (Antique Linen)

Other:
Detail gold embossing powder
Glamour Dust glitter (Crystal)
Gems
Memento marker (Cottage Ivy)
Wire
Foam dots
Gold gel pen


Thanks for stopping by!

Friday, 29 July 2011

March of the Penguins!

Hello, welcome if you've arrived here by way of Michelle's blog on the Shady Tree Studio blog hop! If you didn't come that way and you'd like to follow the hop then back up to Shady Tree Studio where it all starts and find out how to be in with a chance of winning one of the eight sets of stamps up for grabs!

I love the penguin that features in the new Naturally Christmas set! If you've seen the movie March of the Penguins, you'll probably remember what an endearing sight it is to see a whole horde of penguins all stoically making their way across the snow and ice. I thought it would be fun to recreate that "en mass" experience on a pop up stage card!


The penguins are quite tall so I added some torn card stock snowbanks towards the front of the stage to fill in the space (if your taller pop up items are too near the front they'll hang over the edge when the card is flattened down for mailing). The penguin at the back is raised up on a torn cardstock hillock so he gives some variety to the height of the group, too.

I wanted the trees to have taller trunks so I didn't ink up the end of the trunk before stamping so that I could extend the lines with a fineline marker.

The back of the card is lined with a piece that has snowflakes embossed using a Fiskars texture plate and I sprinkled glitter around the feet of each penguin and along of the joins where the snowbanks meet the base of the stage.

To keep the card closed, I created a belly band using the checkerboard border and a sentiment from the other new set being released today - Homespun Holiday. The checkboard lines up easily to extend it right across the band but if you're worried about it, just make sure the join comes where you want to place an embellishment or other element (the cut out penguin in this case).

Stamps: Naturally Christmas and Homespun Holiday sets by Shady Tree Studio
Paper: Smooth white, black
Ink: Brilliance by Tsukineko (Graphite Black)
Other: Copic markers, Threading Water edge punch, Fiskars texture plate, Glamour Dust glitter


The lovely Carla is the final stop along the way, I'm sure she'll have something wonderful to share with you on her blog at Paper Pastorale. Hope you've been enjoying the new stamps so far along the hop!