Showing posts with label jewellery. Show all posts

Saturday, 7 March 2015

A mini exploration

The current challenge at PaperArtsy is to do some artwork on a miniature scale.

I decided to go down the jewellery route and use a glass domino but keep it quite simple and graphic. I heat embossed the car with black detail powder directly onto the glass (watch your fingers if you do this, it gets hot!). This does, of course, mean that any writing on your stamp will appear in reverse on your finished project but the word "Chevrolet" is tiny here so that even with detail powder, it's indistinct enough to get away with it! I deliberately left a few little stray speckles of powder rather than wiping it ultra clean before heating it as I thought it added to the slightly aged look of the piece.

I stamped a single word on paper, sponged on a bit of Vintage Photo ink, stuck the domino onto it with a smear of Glossy Accents and trimmed round once dry. I finished the back by adding metal leaf topped with a layer of resin.

Domino pendants are more often portrait orientation so to keep the bail from looking out of proportion on the horizontal format, I added a couple of small springs glued either side of it. I think it kind of echoes the grille or bonnet detail of a vintage car, too.

Stamps:
Mini 81 by PaperArtsy
Everyday Petites by CHF (retired)

Ink:
Brilliance Graphite Black by Tsukineko
Versafine Satin Red by Tsukineko
Distress Vintage Photo by Ranger

Other:
Glass domino
Black detail embossing powder
Glossy Accents
Silver coloured bail
Small springs
Two part epoxy glue
Lisa Pavelka Magic Glos resin
Flitter Glue and Sheffield Steel Mega  Flake 

Thanks for stopping by!

Friday, 8 August 2014

Paperbabe summer blog hop!

Welcome to  the Paperbabe Stamps Summer Blog Hop featuring new stamps... Kim is Paperbabe's owner and designer and she's invited some of her stampy friends to play with some new stamp designs!

The new release includes "Folk Fabrique", "Doll Face", "Mayleedee Little Red", "Mayleedee Frost Fairy" and "Dillon Frost Sprite" which are available at Etsy and the WebShop.

Be sure to stop by PAPERBABE if you are just beginning the hop to see the endless possibilities with these new stamps and to leave your comments along the way... as there are some fabby prizes to be had! To celebrate there will be the ENTIRE release and a very special not yet released rubber stamp up for grabs to a very lucky winner! 

I've been playing with the lovely Folk Fabrique set and have three projects to share with you - all quite different from each other!

First up, of course I had to make a card. I experimented with stamping the peacock outline in a light coloured ink and then stamping the more solid coloured shapes. I liked the result but then hit on an even "cleaner" way to use the outline - I stamped in black on a sheet of paper and then put it on a lightbox with my cardstock over the top. Hey presto - visible outline to guide the solid stamps but no actual marks on the cardstock! Of course, I did my own thing a bit, extending some of the tail feathers and adding an extra little flourish at the side. Thats one of the beauties of stamps like these - infinite possibilities!

I used a Spica glitter pen to add the lighter turquoise colours so there's some sparkle, too.

The elegant little sprigs looked perfect for a bit of faux cloisonne to me so my second project is a pendant made with three layers of black UTEE, Perfect Pearls in Sour Apple and Blue Raspberry and a bit of gold ink. I finished off with a layer of Triple Thick (I find it better that Glossy Accents over an embossing enamel surface).

The base is a simple chipboard shape cut with a steel rule die and hole punched with a Crop-a- Dile. Scrap mountboard is perfect for this kind of thing and can often be obtained very cheaply or even for nothing if you catch your local framing shop in the right mood - just ask if they have any spare offcuts.

And finally I couldn't resist taking the name of the set at face value and stamping on fabric. Lots of the stamps in the set lend themselves to pattern building - I chose the lotus flower and made a lavendar bag (it could just as easily be a little gift bag though - you could make a faux cloisonne pendant and pop it inside!). 

I used a Memento marker to shade the inner part of each petal just slightly and finished with a row of gold dimensional paint dots across the middle row.

From here, the next stop along the way is the talented Kim Dellow.  

If you didn't "begin at the beginning" and you'd like to see what everyone else has been up to, here's where you want to be to follow the hop:

Kim Costello
Chris (DT)
Kerrie (DT)
Lady (DT)  
Delphine (DT)
Jackie (DT)  
Sandie 
Katy  
Joanne (you are here!)  
Kim Dellow
Tricia  
Paperbabe Stamps 

Thanks for joining us! Winners will be announced on the Paperbabe Blog on the 15th when the newest challenge will also be starting! You have until the 13th to hop along leaving comments for the chance to win!

Friday, 1 February 2013

Craft Stamper Best of 2012

Hello and welcome if you're hopping along with Craft Stamper magazine today! If you didn't know about the hop, you might want to go to the Craft Stamper blog and start there as there are prizes to be won!

I'm Joanne and I've been with the Craft Stamper design team since summer 2011. I love to use my stamps in all kinds of ways, not just for cards so you're quite likely to find me playing with UTEE or polymer clay as well as colouring with Copics or pencils and finding interesting embellishments in unlikely places!

My "best of" for 2012 is a simple combination of chipboard, UTEE and Perfect Pearls. I made several pieces of jewellery this way during the year and enjoyed it every time. You may have seen my Iridescent Enamels pendant and earrings in the December issue of Craft Stamper using chipboard domino and inchie shapes and colours reminiscent of peacock feathers.

This project uses the same technique - add three layers of UTEE to a chipboard circle, brush with Perfect Pearls and then remelt the UTEE so it takes a textured impression when you press a stamp into it.

If you want to concentrate colour in particular areas of the design once it's embossed, you can use a Versamark pen and brush on a little extra Perfect Pearls. A finishing coat of gloss really brings out the colours and provides a professional enamelled finish. I like Decoart Triple Thick for this as I've found it more successful than Glossy Accents over the UTEE base (my attempts with Glossy Accents have ended with it splitting and leaving cloudy spots).

Spot Prize! 
Heavy weight chipboard is a great base for projects like this as it's inexpensive and offers a whole range of options in terms of shape. Tando Creative is offering a "spot prize" for today's hop with the winner choosing £20 worth of Tando Creative goodies! There's a fabulous range to choose from: shapes to do this sort of project, shapes to stamp on or to embellish with, masks or stencils - entirely up to you! To be in with a chance of winning simply leave a comment on this blog post by midnight on Friday 8th February 2013. The winner will be drawn at random week commencing Mon 11th February.

The letter you are collecting from me to help you spell the phrase for the main prize draw is:

Next stop along the way is one of my favourite stampers, Paula Whittaker at her blog Just For One Day. Don't forget to leave a comment here if you'd like to be in with a chance of the Tando prize!

If you get lost on the hop at any time, pop back to the Craft Stamper blog and follow the links from there.

Thanks for stopping by!

Supplies:
Tando Creative Circles grab bag
Black UTEE by Ranger
Grape Fizz and Blue Raspberry Perfect Pearls by Ranger
Bubbles Border stamp by Lost Coast Designs
Triple Thick Gloss Glaze by Decoart

Saturday, 6 October 2012

Take three - "weathered metal" inchies

Tando Creative is celebrating this week - third birthday already!

To celebrate, the design team has offered up a variety of projects based around the number three and there are tutorials for each of them if you want to have a go - check out the Tando Online Classes blog.

I used three inchies for my project. The Tando chippie is a lovely weight to work with and makes a great base for jewellery as it's sturdy enough that the finished piece feels quite substantial.

I've used an embossing folder and some VerDay paint to create a weathered copper finish for a pendant base. The paint is fun but you could use any technique you like to add interest to your inchies before gluing them together.

Supplies:
Chipboard inchies by Tando Creative
Tim Holtz Texture Fade embossing folder (Stripes)
VerDay paint by Ten Seconds Studio (Copper)
Patina Solution by Ten Seconds Studio
Copper wire
E6000 and Superglue adhesives

I've done a short video tutorial for this project. The YouTube description area includes a step-by-step that you could print out if you would like to have a go and find printed reminders easier to work from - just click on the YouTube icon at the bottom right of the video preview to watch it over there rather than embedded here.


Thanks for stopping by!

Saturday, 4 August 2012

Inchies necklace

We're using metallics as our design inspiration at Tando Creative this week.

I seem to be on a bit of a jewellery kick at the moment! I've used three inchies and gently round the corners (I do love that tiny ⅛" on the newer Corner Chomper!) as well as punching holes with a Crop-o-Dile.

Each inchie is done with a different metallic finish. I used three coats of silver UTEE on each square and a layer of Perfect Pearls on two of them (both from the Metallics kit - one Gold, one Bronze). I pressed a stamp into the warm UTEE for texture. I've then glazed them with Decoart Triple Thick - the last time I tried this I used Glossy Accents and it really didn't work (it didn't dry evenly and it split apart in several places so the piece ended up in the bin). I was impressed with the Triple Thick in this regard, it dried evenly and with no problems.

I added jump rings to each piece, filled with more Triple Thick and then finished with a contrasting metallic colour once dry.

The inchies are joined together with jump rings and attached to a necklace chain through a little piece of aluminium tubing superglued to the top one.

The surfaces are shiny enough that it made photographing it a bit of a nightmare but I hope you get the idea!

Supplies:
Chipboard inchies (Tando Creative)
Silver UTEE 
Silver acrylic paint
Crackleglaze background stamp (Indigo Blu)
Perfect Pearls by Ranger (Gold and Bronze)
Jump rings
Aluminium tubing
Triple Thick glaze by Decoart

Thanks for stopping by!

Wednesday, 25 July 2012

Button necklace

The challenge for July over on Tando Creative Challenges is to use texture of some sort on your project. Lots of samples have already been posted this month - I'm part of the rear guard action!

I used a big chipboard button from the grab bag, coloured it black with a Copic marker and created texture with an embossing folder for this pendant.

After embossing, the surface is dabbed with Versamark and I've added Perfect Pearls in three colours (Gold, Copper and Bronze - all from the Metallics kit) and used a length snipped from a bamboo skewer to secure a chain through the button's holes. It's simple to do - just thread the chain from the back of the button through the first hole, wrap round the skewer (I went round twice) and back down through the hole. Come up through the second hole, wrap round the skewer and go back down through the hole. Juggle the two ends as necessary by easing through the holes and round the skewer so you get even lengths of chain each side.

Supplies:
Chipboard button grab bag (Tando Creative)
So Trendy M-Bossabilites folder (Spellbinder)
Black Copic marker
Versamark (Tsukineko)
Gold, Copper and Bronze Perfect Pearls (Ranger)
Bamboo skewer
Chain

I've made my first ever tutorial video to demonstrate the process - constructve criticism very welcome! If you'd like go through to YouTube instead of watching it embedded here, the description area has a "checklist" of the steps involved that you can copy and print if you want to have a go yourself and would like a reference on hand.


There's still time to join in the challenge and be in with a chance of your name being pulled out of the hat to win a great prize at the end of the month - check out the blog and add your link if you'd like to play along!

Thanks for stopping by!

Tuesday, 24 July 2012

Steampunk circles

We're going round and round at Tando Creative this week,  taking our design inspiration from"circles". Lots of possibilities with this one! I've used one of the jewellery shapes that's based around fused circles and gone a bit steampunk with it, adding cogs that are circular too!


I started by colouring the frame (including the edges) black with a Copic marker and then gave it a couple of coats of silver UTEE, leaving that "orange peel" effect you get when you don't aim for full coverage. I used a bit of black acrylic paint to further highlight that texture.

I added text papers from an old book to the base piece and knocked them back a bit with a smudge of gesso. A stamped clockface stuck to a glass pebble fills the largest circle and I added a stamped swirl plus some holeless beads with some silver paint (to mimic ball bearings) to the one above. I punched a hole through the top circle for a pendant cord and added a few more fake bearings.

The teardrop shape is fill with Glossy Accents and has some tiny cogs embedded in there. They were mostly black plastic so they've been treated with silver acrylic paint. The one that hangs over the edge of the frame has a watch winder with a tiny blue gemstone stuck in the centre.

Supplies:
Jewellery Circle Pendant Straight (Tando Creative)
Silver UTEE
Black and silver acrylic paints
Old book
Gesso
Stamps from Inchie Style (CHF, retired)
Tiny cogs
2mm holeless beads
Glossy Accents
Glass pebble

If you're looking for Tando stockists you can find a list here.

Thanks for stopping by today!

Tuesday, 3 April 2012

Inspired by Klimt

Our challenge for March over on UKStampers is to take inspiration from a modern (fairly abstract) painter and alter something.

I've altered a chipboard domino to make a pendant inspired by Gustav Klimt. I didn't look at a particular work of his, I just worked on my association of him with rich green and gold and fluid curved lines.

I didn't have black UTEE which is the ideal for this "faux cloisonne" technique so I used three coats of clear with black pigment ink and then a coat of black detail embossing powder just to make sure! The final surface is coated with Versamark and dusted with a couple of colours of Perfect Pearls, reheated to melt before pressing the stamp into the soft surface.

Once it was cool, I used a Versamark pen and added a little more Perfect Pearls to a few circles. I gave the whole thing a couple of coats of Klear floor polish to give it some sheen. This is take two - the first one had a coat of Glossy Accents on it which I left to dry overnight. This morning it was cloudy in the middle and had deep splits in three or four places - I guess it didn't like the non-porous surface!

The edges and the back are finished with gold acrylic paint and I rounded the corners with the ⅛th inch Corner Chomper.

Stamps: Bubble Border (Lost Coast Designs)
Paper: Chipboard domino by Tando Creative
Ink: Brilliance by Tsukineko (Graphite Black)
Other:
Clear UTEE by Ranger
Detail black embossing powder
Perfect Pearls by Ranger (Forever Green and Sunflower Sparkle)
Gold acrylic paint
Versamark pen and fine paint brush
Corner Chomper
Klear floor polish
Jewellery findings


Thanks for stopping by!

Friday, 9 December 2011

White Christmas

Glenda Waterworth is hosting a "white Christmas" challenge on her blog with a great prize up for grabs. For each entry to the challenge, she's adding £1 value to a gift voucher to spend on Chocolate Baroque stamps - check out the blog for full details here.

I was in the mood to play with some polymer clay so I've taken a completely left-field approach here and made something white to give as a Christmas gift - hope that's within the spirit of the challenge!

I had some fun trying out something new with this - making a mould from a stamp to get an "outy" rather than an "inny" on my finished piece. When you press a stamp into polymer clay you get depressions where you would have ink if you stamped on paper. With this technique, you press the stamp into some scrap clay and bake it and then use that to make the textured impression on your finished piece. I pressed mine into white clay, cut it out with a cookie cutter and then baked it over a dud lightbulb to get a dished shape on the finished piece. You need to add a little "platform" of clay inside so that there's a flat surface if you want to add a brooch back when you do this but you could also make a hole and use it as a pendant piece if you wanted.

I spritzed some Glimmer Mist on and let it pool in the crevices. I think the finished piece has a bit the look of something you'd see on ornate plasterwork ceilings!

Materials:
Nature's Paisley stamp set (Chocolate Baroque)
Sculpey Premo polymer clay
Glimmer mist (Antique Brass)
Clay tools (acrylic roller, cookie cutter)
Brooch back


There's nearly a week left to have a play if you fancy joining in with the White Christmas challenge - remember the more players there are, the bigger the prize pot for the random draw! Details here.

Thanks for stopping by!

Wednesday, 20 April 2011

Make an impression!

Carol and I decided to dry emboss our Tando chipboard for our technique pieces this week. Do pop over to the Tando blog to see what Carol has made too!

I have two projects to share with you, a little jewellery piece one at one end of the size spectrum and a notebook at the other!

The domino pieces are a nice scale for jewellery, being 1" x 2". I put this one in the Cuttlebug Jamara folder, lining it up against the bit of the design I wanted before I closed the folder and ran it through the Big Shot. I ran it through a couple of times for good measure but you don't need to do anything special to get a good embossed impression.

I coated the piece with Rub n Buff and then with acrylic paint to accentuate the design. I wiped most of the paint off and then dabbed a little more RnB over the high spots.

The bail to thread the chain through is, believe it or not, a piece from a video cassette! I dismantled an old one a while ago to see if there were any "useful" bits and pieces in there. A little Krylon pen to key the surface and then a little RnB to match the pendant et voila! If you wanted it silver it would be good to go with no effort at all.

Materials:
Domino chipboard by Tando Creative

Jamara embossing folder

Rub n Buff by Amaco (Gold Leaf)

Acrylic paint (Raw Umber)

Divided tube from an old video cassette

Krylon pen (Pale Gold)


At 7" x 5" the notebook is less detailed but lots of fun to work with! As it's bigger than the embossing folder I turned the folder sideways to emboss the top part then turned the whole lot around and embossed the bottom part. Adding a band across the design hides the "join" in the embossed areas.

I then used a technique I saw a while ago on somebody's blog but I'm afraid I can't remember whose - let me know if it was you and I can pop a link in!

Wax pastels are soft enough that they lay colour down really easily on the raised part of the embossing. I used several shades of blue and green for this. You then add gesso over the whole surface and leave it to dry thoroughly. Gently sanding back the gesso exposes the colour and gives a shabby, weathered effect. I sprayed mine with some matt sealant to make sure the colour wouldn't rub off and the notebook would stand up to being handled.

I covered a piece of cardstock and a Dymo strip with aluminium tape, "tarnished" it with some black acrylic paint and stamped a fountain pen before adding a couple of screw head brads that have been in my stash forever!

I don't have anything like a Bind it All or Cinch, for the few projects I do that would need it it's not worth either the expense or the storage space. For something like this, I just punch holes with a Crop a Dile and use a coil from an old notebook (use the covers of the old book to line up where to punch holes in your new cover).

Materials:
Chipboard sheet from Tando Creative
Tim Holtz Texture Fade (Retro Circles)
Wax pastels
Gesso
Dymo
Aluminium tape
Black acrylic paint
Pen from On the Desk stamp set (CHF, retired)
Stazon by Tsukineko (Jet Black)
Screw head brads
Krylon Matt spray sealant


Thanks for stopping by!

Friday, 13 August 2010

Ice queen!

I've been playing with Tando chippie again - still trying to kick start that Christmas feeling so I can get a head start on cards! I decided to use the separate snowflake flourish that comes in the set with the snowflake plaque to make a wintery brooch. It would be good on a bag or jacket, I reckon.

I used a freebie CD to cut a freehand ice shard for the base. The Tonic Studio scissors go through easily and I find if you warm the CD up a bit with your heat gun first to soften it you're less likely to have it crack or shatter as you cut.

I covered the snowflake flourish with a couple of coats of silver UTEE and rubbed pearl and turquoise Perfect Pearls onto it while it was still warm, concentrating more colour towards the bottom of the shape.

A couple of smudges of Glossy Accents to hold a little sprinkling of silver micro beads finishes it off.

Supplies:
Snowflake plaque by Tando Creative (find Tando stockists here)
CD
Versamark by Tsukineko
UTEE (silver)
Microbeads (these are actually steel ones sold for nail art)
Glossy Accents (as adhesive)
Perfect Pearls by Ranger (Perfect Pearl and Turquoise)
Brooch pin


Thanks for stopping by!

Thursday, 1 July 2010

Cracking pendant

I've been playing with Tando chipboard again - the large pendant drop this time. It's an elegant and timeless shape that would stand up to all sorts of treatments. I decided to slather it in some of my favourite paints for a shell-like look.

Viva Decor Croco paint is great fun to use - you're never quite sure exactly what it will look like once the crackling has fnished! I punched holes along the bottom edge of the pendant first, using a Crop-o-Dile, and then covered thepiece with Turquoise Croco and left it overnight to do its thing. I rubbed black acrylic paint on to accentuate the cracks and then sponged some Precious Metal paint over the top and nestled beads into the holes, using a gel superglue to stick them in. The larger beads were salvaged from my ancient bead box and were a particularly nasty brown plastic so they've been coated in Precious Metal paint to make them look like pearls.

I finished the top with an extra large eyelet. As the threading hole was quite a bit larger than the diameter of the eyelet's shank, I squished the eyelet flat first and glued it into place rather than trying to get it to grip round the hole.

I used a double strand of leather thong to hang the pendant, binding with some black linen thread to finish it off.

Supplies:
Large Pendant Drop by Tando Creative (you can find a list of Tando stockists here)
Croco paint by Viva Decor (Turquoise)
Precious Metal paint by Viva Decor (Blue Azure and Mother of Pearl)
Black acrylic paint

Extra large Eyelet by We R Memory Keepers (Pewter)
Beads
Leather thong
Linen thread


Thanks for stopping by!

Monday, 7 June 2010

Paisley Pendant on the Hop!

I've said it before and no doubt I'll say it again - I do love the versatility of backgrounders! So I'm delighted that CHF's range of background stamps are the featured line for this first week of the 12 Weeks of Summer Fling! Welcome if you are following the blog hop and looking for a little backgrounder inspiration.

What's the 12 Weeks of Summer Fling? Each week will feature one of the rubber stamp lines at CHF with a blog hop and special gallery showing new samples using stamps from that line. The featured line will also be on sale for the week so definitely the time to add to your collection:) Two Gift Certificates will be awarded to 2 lucky winners who successfully follow the blog hop & comment as they go in the time allotted. This is not a race. All Blog Hops will start from the Be Creative Blog on a Monday, comments must be made before midnight EST on the Thursday of that week & winners will be announced on the Friday. 1st prize is a $20 CHF Gift Certificate, 2nd Prize is a $10 Gift Certificate which will be emailed to the winning participants. The Gift Certificates will be valid for 6 mths from date of issue. PLEASE NOTE that if you have a Club CHF award awaiting you on your next order, you will need to wait for the following order to use your Gift Certificate as the store only allows one discount per order. If you upload a qualifying card (using the featured week's stamp line) to the CHF special gallery for that week you will be eligible for the Design Team's Favorite prize which will be a rubber stamp/stamp set of your choice up to the value of $16.99 Looking forward to having you play along with us for the summer.

So... on with the backgrounder show!

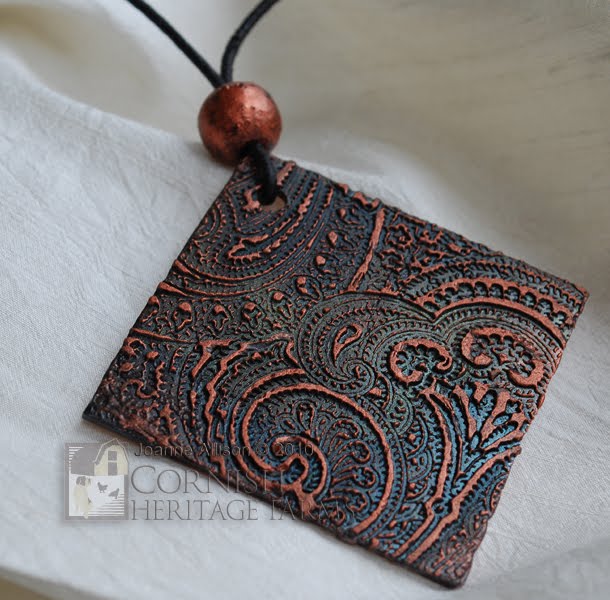
Paisley was one of my first background stamps and it's such a timeless and classic pattern that I can't see me getting tired of this one. Like many of the BG stamps, the scale of the pattern lends itself very nicely to jewelry so I've made a pendant to share with you today.

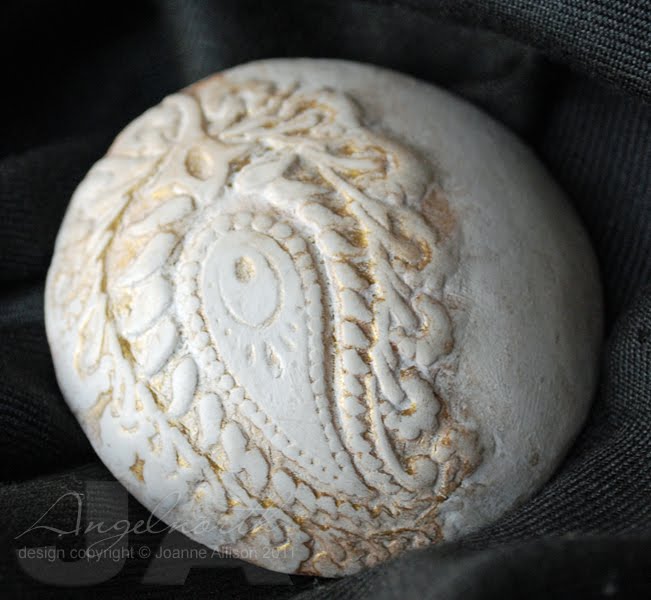
I started with a 2 ¼" square of heavy chipboard and punched a hole in one corner with a Crop-0-Dile. Then I dusted two colours of Perfect Pearls onto a sheet of paper and pressed the stamp into them and set it to one side, ready for action after the next step.

I added two layers of UTEE crystals (melt the first layer, add another on top and melt that) and then quickly pressed the stamp onto the piece while the UTEE was molten. Give it a few seconds to set and then peel the stamp away. If you find the UTEE has oozed over the edge, just trim it off with sharp scissors while it is still slightly warm and soft (I love my Tonic studio scissors for this). Same with the hole at the top, just repunch with your Crop-o-Dile if necessary. Doing it before the UTEE is fully cold means that it won't crack or shatter.

Some of my high spots were just a bit too high so I carefully shaved off just a tiny bit with a blade and then rubbed over the whole thing lightly with fine sandpaper.

I finished by swiping Precious Metal paint over the whole piece, using Cut n Dry foam and being careful to keep it flat so the paint wasn't pressed down into the recesses of the piece. A wooden bead that was coated in black embossing powder and then painted with the same copper paint makes a finishing touch as the pendant threads onto a leather thong.

Stamps:
Paisley backgrounder (Cornish Heritage Farms)


Other:

Heavy chipboard

UTEE by Ranger (Black)

Perfect Pearls by Ranger (Patina Green and Patina Blue)

Crop-o-Dile

Wooden bead

Leather thong

Precious Metal paint by Viva Decor (Copper)

Sandpaper


Next stop along the hop today is Tracy who has been stamping up a backgrounder storm recently so I'm sure she'll have something special to share with you! Don't forget to leave a comment here before you go to increase your chances of winning and if you have CHF backgrounders, why not create something with them this week and upload to the special gallery for your chance at the Design Team's Favorite prize?

Comments for this week's hop need to be left by midnight EST on Thursday June 10, 2010 to be eligible for the draw.

Thanks for hopping by!

Thursday, 20 May 2010

Dragonfly dreams

I'm sharing a piece made with Tando Creative chipboard today. I love dragonflies and thought the new large dragonfly shape would make a lovely brooch.

To mimic a little bit of the iridescence of dragonfly wings, I melted three coats of clear UTEE onto the wings and when almost cool, I rubbed several different Perfect Pearls colours on there. I remelted and added more Perfect Pearls to build up the colour depth and finally remelted and pressed a stamp into the molten UTEE. Finally, I picked up a tiny bit of pearlescent acrylic paint on that most sophisticated of crafter's tools (my index finger) and swiped over the high spots of the textured wings. You can click through for a better view of the pic if you'd like it.

The body was coloured with a black marker and then I added Glossy Accents and a row of Dew Drops to finish it off before gluing on a brooch back.

Supplies:
Dragonfly by Tando Creative (you can check out Tando stockists here)
Cheesecloth backgrounder (Cornish Heritage Farms - now available in the UK from Bubbly Funk {here})
Clear UTEE by Ranger
Perfect Pearls by Ranger (Turquoise, Berry Twist, Forever Violet, Forever Green, Forever Blue)
Pearlescent turquoise acrylic paint
Dew Drops by Robin's Egg
Glossy Accents by Ranger
Brooch back
E600 adhesive

Thanks for stopping by!

Monday, 17 May 2010

One stamp - different looks!

I'm not sure who stole last week - sorry not to have been around! I thought I would share two very different projects made with the same stamp today.

One of the reasons I love my backgrounders is that they are very versatile. My first project today is a straight paper craft project - a wedding card. I'm blaming forum buddy Janice for this one! Not only was her son getting married last week but while refusing to reveal her outfit in advance, she showed us a pic of Audrey Hepburn in the race scene in the movie My Fair Lady as a tease for what her hat was like! I still had the image of those gorgeous black and white costumes in my head when I sat down with this new Fuchsia Tiles background stamp.

Stamps (Cornish Heritage Farms):
Fuchsia Tiles Backgrounder (releasing Tuesday May 18th)
Wedding Centers (Mona Lisa Moments line)

Paper:
Smooth white
Simply Linen Black

Ink:
Versafine by Tsukineko (Onyx Black)

Other:
Velvet ribbon
Rose from Wild Orchid Crafts
Stick pin
Brackets die (Tim Holtz Alterations line by Sizzix)


My second project is a bit different! I revisited the mica shift technique I used to make this polymer clay pendant a few weeks back. I used gold clay this time and made a large pendant piece by cutting a square that takes in nine of the little tiles from the backgrounder. I baked it over a sphere (the top of a tin that had chocolate orange and lemon slices in it - never throw out an interesting container!) to give the piece an overall curve and then added a little loop on the back to thread a necklace cord through.

I think I'm officially fascinated by mica shift now - there's something almost hypnotic about the textural look of the pattern coupled with a surface that's completely smooth to the touch!

Stamps (Cornish Heritage Farms):
Fuchsia Tiles Backgrounder (releasing Tuesday May 18th)

Other:
Sculpey Premo polymer clay (gold and black)
Clay tools (pasta machine, clay blade, acrylic roller)
Klear floor polish (sold as Future floor polish in North America)


Thanks for stopping by today!

Tuesday, 20 April 2010

Mica magic!

I bought Donna Kato's lovely book Polymer Clay: Creative Surface Effects a while back and one of the techniques in there is something called mica shift. I've just had a first play with it to make a pendant.

Some of you have probably heard me say before that one of the things that first drew me to Cornish Heritage Farms was the backgrounder stamps. Woodgrain has long been a particular favourite. You should have heard the squeals of excitement when Liz told the DT what was in store for the All Things Considered line of stamps - scaled down backgrounders! And to make it even better, woodgrain is in the first release, way hay! The smaller scale means they're perfect for things like jewellery projects as well as ATC stamping.

So, back to mica shifting. Metallic or pearl polymer clays contain mica particles. Some bright clayer worked out that if you condition the clay so that all the particles line up and then disturb them by pressing into the clay you can get a pattern that looks 3D even though it's completely smooth to the touch. I thought woodgrain would be the perfect pattern for experimenting with!

After running your clay over and over through a pasta machine (at least twenty times) you press a rubber stamp firmly into the surface. Then use a clay blade to gently slice away the raised portions of the clay. You can then flatten further with a roller but I confess I forgot to do that so I relied on sanding after the piece was baked to get the surface really smooth.

I thought this came out pretty well for a first attempt and I'll certainly be having another go with this technique.

Stamps (Cornish Heritage Farms) :
Country Charm Textures (All Things Considered line)

Other:
Sculpey Premo polymer clay (Copper and black)
Cookie cutter and clay blade
Rubber cord


Thanks for stopping by!

Monday, 29 March 2010

Catchin' a wave

If you're a visitor to the Tando Creative blog then you may already know this but if not then I have news to share! Carol and I have been test driving Di's new white-coated board shapes for the last few weeks and as we neared the end of our experiments, Di invited us both to join the very talented ladies on the Design Team! As most of you know, I love to stamp so I'm very excited to be taking up this new role as the board has been lovely to combine with my stamping habit!

To celebrate, I had another play with the wavy inchie shape over the weekend and did a bit of CD "upcycling" to make this little brooch.

Your Tonic Studio scissors are handy for this kind of project as they cut through a CD with no problem! I cut a little strip and stuck it to an inchie that was first slathered in Ferro. I pressed a moistened stamp into the top part for some pattern and textural interest and then sponged over with some Precious Metal paints once dry.

ETA - Janice asked about the "tooth marks" on the CD strip. They're just the micro serrations of the Tonic blades. I thought it looked attractive so didn't try doing anything to smooth them out.

The whole lot was stuck to another piece of CD, using the edge of the circle to make a gentle curve at the base of the brooch. I coloured the resulting spaces with some more Precious Metal. A couple of flat back gems (courtesy of my Secret Santa - thanks Caroline!) and some tiny nail art gems finish it off.

Stamps:
Beautiful (The Rummage Bin line)

Paper:
Wavy Inchie (Tando Creative - find Tando stockists by looking here)

Other:
Ferro by Viva Decor (Graphite)
Precious Metal paint by Viva Decor (Blue Azure, Lilac, Mother of Pearl)
Freebie CD
Flat back gems
Nail art gems
E6000 adhesive
Brooch pin


You can visit Tando Creative and the other girls on the Design Team through the links in the blog roll over on the right if you'd like to.

Thanks for stopping by!

Friday, 5 March 2010

Dream a little dream

I read Sharilyn Miller's book Rubber stamped jewelry a few months back but got distracted by other things before trying anything out. A couple of days ago I found big bags of clear glass "pebbles" in a local £1 shop and remembered one of the projects in that book used one as an accent. Here's the result - it uses the same base materials as the one in the book but is different in just about every other way!

I made a batch of "sea washed" glass a while ago by breaking a square section bottle and tumbling in a rock tumbler. Some craft shops carry sea washed glass or the Ranger Memory glass range works well if you want a regular shaped jewellery piece. I painted the edges with Precious Metal paint and in doing so hit on the idea of wiping a thin coat of it across the back of the piece as well. I love the effect! The mica in the paint makes the glass just slightly more opaque but it still has a translucence.

The pebble was stuck onto a stamped piece of paper with Glossy Accents, trimmed and edged with copper tape then glued onto the base piece which had been stamped and embossed with detail gold powder. I added Glossy Accents to hold a little drift of seed beads. When dry, I dotted a few beads with the Precious Metal paint to deepen the colour. Stick a pin on the back (hidden by the pebble and beads on the front) and you're done. The cost of this is literally pennies - gotta love that!

I used a backgrounder in this design - one of the reasons I love them is that they're so versatile, useful for everything from a full card front to a small project like this (it's about 6cm/2.5" tall). Backgrounders and their bigger cousins the Scrapblocks are on sale this Friday/Saturday at CHF - buy one and get a second of the same value at half price. You can see the details on the store's home page {here} if you fancy stocking up.

Stamps (Cornish Heritage Farms):
Inchie Style (Rummage Bin line)
Spanish Script backgrounder

Ink:
Versmark by Tsukineko
Adirondack dye ink by Ranger (Espresso)

Paper:
Simply Smooth

Other:
"Sea washed" glass
Glass pebble (the sort used to put in vases)
Detail gold embossing powder
Seed baeds
Precious Metal pint by Viva Decor (Blue Azure)
Glossy Accents
Copper Tape


Thanks for stopping by, hope you have a lovely weekend!

Thursday, 4 March 2010

Cracking up

Another in the series of projects with Di's new board over on Tando today - Carol and I have been playing with Croco paint.

The wavy edges make these new shapes just that bit different - I thought beads would look perfect nestled up into the arched areas and so this little pendant was born. Hey look, no stamping!

The beads are clear crackle glass - the light is flaring off the crackles and making them look opaque white - sorry about that!

I painted the inchie first with black acrylic paint so that the black showed through the cracks of the Croco.

I sponged Precious Metal paint over the dried Croco but didn't aim for full coverage which has given a pleasing, shell like quality to the colour, I think. I added a dab of glue on the ends of the pins for extra security before embedding them in the inchie but the beads are free to twizzle on there so they're "fidget beads"! The board is really thick so not only does it take texture paint like this without warping, you can embed pins and you get plenty of contact area to glue things together (I used a gel type superglue).

Check out the Tando Creative blog for more cracking projects on the new board!

Supplies:
Wavy inchie - Tando Creative (you can find Tando stockists by looking here - I know Bubbly Funk already has this shape in stock, not sure about other places)
Croco paint by Viva Decor - Turquoise
Precious Metal paint by Viva Decor - Blue Azure
Black acrylic paint
Aluminium tubing (from a model shop)
Czech glass beads
Pins (from shirt packaging!)
Gel superglue
Necklace findings
Rubber cord


Thanks for stopping by!

Monday, 15 February 2010

Carved jade!

No I haven't branched out into semi precious stones - I've been playing with polymer clay!

This pendant resulted from stewing ideas from several sources. I've been reading Donna Kato's beautiful book The Art of Polymer Clay - Creative Surface Effects. The shape of the clay piece is influenced by some of Donna's pieces.

Desiree McCrorey makes beautiful faux ivory pieces and I wondered whether it would be possible to use the technique with other colours of clay to create different effects.

Finally, Julie Picarello does amazing things to turn polymer clay into gorgeous jewellery. I was particularly taken with her curved brass tube bails and wanted to try something similar.

I used green, translucent and a pinch of pearl clay to mimic a jade or malachite look. I think it worked although I'd probably use a higher proportion of translucent clay next time. I found that placing a piece of conditioned clay onto my stamp and rolling across the back firmly with an acrylic rod gave me a deeper impression than just stamping down onto the clay would have done.

Buffing the clay piece once baked gives you more textural contrast between the high spots which take on a sheen with the buffing and the low spots that are out of reach.

The copper tubing came from a model shop that sells supplies to miniature railway enthusiasts and special thanks go to my dad for hints and tips on tube bending!

Supplies:
Sculpey Premo polymer clay (green, translucent, pearl)
Tiled Scallops backgrounder (Cornish Heritage Farms)
Copper tube
Copper Wire
Copper findings
Rubber cord

Thanks for stopping by, hope you get your week off to a great start!