Showing posts with label autumn. Show all posts

Monday, 10 October 2022

Autumn leaves

Time for a new challenge at Let's Squash It  and I’m delighted to be joining Jo and Gail as Guest Designer again this month. 

The theme this time is trees and/or leaves. I did a bit of both with trees on the embossing folder and die cut leaves for good measure. This little chap had a wintery adventure at this woodland spot last year, padding through snow between the trees — I thought it might be fun to give him some crunchy autumn foliage to kick up this year! I inked a piece of card with a few Distress inks then die cut the leaves to put under his feet.

Stamps:
Pointy Hat Gnome (Lost Coast Designs)
Sentiment from Essential Messages (Hero Arts, retired)

Paper:
Bristol board 

Ink:
Brilliance by Tsukineko (Graphite Black, Pearlescent Chocolate)
Tim Holtz Distress ink by Ranger (Mustard Seed, Rusty Hinge, Spiced Marmalade)

Other:
Woodland embossing folder (Stampin’ Up!)
Leaves dies (Impression Obsession)
Stitched rectangle dies, A6 size (Paper Rose)
Fineline marker
Copic markers
Gel glue

Why not break out an embossing folder and something with trees or leaves and come join the fun, there’s always a little prize on offer for a randomly chosen winner at Let’s Squash It and it’s always a lovely bunch of crafters taking part!

Oh, and with his drift of autumn leaves and backdrop of tree trunks, Gnomie thought he should enter the Four Seasons October challenge, too!


Friday, 7 October 2022

October elements

Shabneez has chosen our mood board for October's "elemental" challenge at Daring Cardmakers this week. As ever, just choose at least three elements to kickstart your card.

I chose the brick wall, a skinny circle (inspired by the rims of the things bottom right — I think they’re aerosol cans but I’m not 100% sure!) and some leaves. 

I decided to combine with a couple of other challenges too. The current Die Cut Divas theme is watercolour — I did the bricks by colouring an embossing folder with a couple of Momento markers and pressing a piece of watercolour paper onto it. I got a better impression on the test piece I did — typical! It still gave me a starting point, with a brush and a mixture of Distress inks and watercolour paints I ended up with a reasonable wall. I also watercoloured the die cut leaves.

An old friend from the days of Crafty Secrets being a sponsor company at Splitcoast is co-running a challenge based on the Four Seasons — I thought this fit the bill for autumn so I’m linking up for the October challenge there too.

Supplies:
Watercolor paper
Brickwork embossing folder (Tim Holtz/Sizzix)
Momento markers
Winsor & Newton watercolour paints
Stitched rectangle dies, A6 size (Paper Rose)
Leaves dies (Impression Obsession)
Fine Frames dies (Altenew)
Sentiment from Big Day Today (Waltzingmouse Stamps, no longer with us)
Brilliance by Tsukineko (Pearlescent Chocolate)
Tim Holtz Distress ink by Ranger (Tumbled Glass, Rusty Hinge)


Friday, 23 September 2022

Changing seasons

Our challenge at Daring Cardmakers this week is being set by Dawn and she’d like to see something influenced by the changing seasons.

I’ve opted for the obvious autumnal feel and also combined with the current challenges at Let’s Squash It (emboss two thirds of your card) and Die Cut Divas (autumn). 

On my daily walk up the lane I pass lots of interesting dry stone walling, some of it a little tumbledown, some of it mossy or supporting brambles as well as keeping the cows and sheep where they should be! I haven’t used this folder for ages and I thought it would be nicely rustic with the autumn leaves. I added a bit of ink to the folder before embossing to accentuate the lines.  

Unusually for me, there’s no stamping (other than the sentiment). 

Stamps:
Sentiment from Big Day Today (Waltzingmouse Stamps, no longer with us)

Paper:
Bristol board
Kraft

Ink:
Versafine by Tsukineko (Vintage Sepia)
Tim Holtz Distress ink by Ranger (Vintage Photo)

Other:
Dry stone wall embossing folder  (Crafter’s Companion) 
Pan pastels
Leaves dies (Impression Obsession)
Corner Chomper 
Nail art gems


Friday, 2 September 2022

September elements and link in the chain

A two-in-one post today since the second of the month (reveal day at Card Chain Challenge) coincides with the first Friday (our “elemental” challenge at Daring Cardmakers). 

Miri has chosen our DCM mood board for September — as ever, just chose at least three elements to kickstart your project. I chose the surface rings on the puddle, the autumn leaves and a circle. I used Pan Pastels to colour the die cut leaves and added the framing for the circle as an afterthought so it’s drawn on with a fineliner and a Copic marker. The dots are my trusty tomato paste tube and a few tiny nail art gems.

Just realised Die Cut Divas have an autumn theme this time around so I’m linking this card up there, too. 

Stamps:
Sentiment from Say It All (Hero Arts, retired)

Paper:
Bristol board

Ink:
Versafine by Tsukineko (Vintage Sepia)

Other:
Retro circles embossing folder  (Tim Holtz/Sizzix) 
Pan pastels
Circles dies (Spellbinder)
Leaves dies (Impression Obsession)
Stitched rectangles A6 size (Paper Rose)
Tomato paste tube
Nail art gems

My Card Chain Challenge card went to Pat in Texas this time. From the options on offer I chose the theme of fruit and flowers and gave this lovely lemon set its first outing (I have blogged another card with it already but this one was made and sent before that was made). It’s almost my usual one layer card for CCC, just the little blossom is die cut and added over the base layer. 

There’s still time to sign up for the September chain if you fancy it, details here.

Stamps:
Lemon Blossom (The Greetery, plus matching dies)

Paper:
Bristol board

Ink:
Brilliance by Tsukineko (Pearlescent Chocolate)
Various yellow, green and pink inks (I failed to keep note!)

Other:
Copic marker
Nail art gems
Corner Chomper


Friday, 2 October 2020

October’s elements

Dawn has chosen a lovely picture for inspiration for our ‘elemental’ challenge over at Daring Cardmakers this week.  As ever, just choose at least three elements to kickstart your project. 

I picked the cable knit, book page, twine, autumn leaf and airmail envelope stripes for a collage-style card.

We recently had a good clear out prior to getting our dining room plastered and there were a couple of books that were too shabby to donate to a charity shop so I “rehomed” them in the craft room and used a page here. I embossed a torn piece of kraft cardstock and layered up with a stamped leaf and some twine. I’d just finished a book of airmail stamps and there’s a little sticker strip along the edge of the book so I used that to underline the sentiment. 

Retro Rubber’s current challenge is “anything goes” and as I’ve had the leaf set for five years or more, I’m playing along there too. 

Stamps:
Falling Leaves (Tim Holtz/Stampers Anonymous - I’ve had mine five years or so)
 Sentiment from Say It All (Hero Arts, retired)

Paper:
Bristol board
Kraft
Old book page

Ink:
Brilliance by Tsukineko (Pearlescent Chocolate)

Other:
Crochet thread
Copic markers
Cable knit Dynamic Impressions embossing folder (Stampin Up!)
Airmail stripes from book of stamps

Here's the inspiration picture if you would like to join in with us at DCM this week:


Thanks for stopping by!

Friday, 2 November 2018

October's link in the chain

I joined in again with the Card Chain Challenge for October.

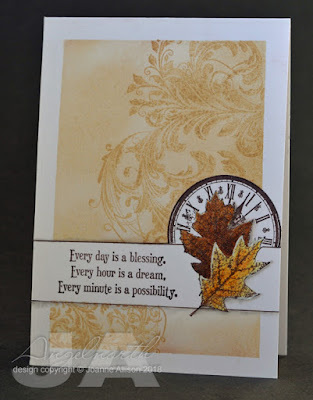
From the options for the month I chose the sketch and the theme of clocks and made this one layer card which has gone to Cat. A one layer card is ideal if you're airmailing something, I find!

I stamped the top leaf and masked it, then the second leaf and the sentiment, masked those and stamped the clock. Lastly I masked clock and the edges of the card and sponged with Antique Linen before stamping the flourishes in the same colour for a tone-on-tone effect.

Fineline marker pen defines the sentiment strip and Copics add colour to the leaves and drop shadows to the various elements to give it some illusion of depth. I added a bit of sparkle with some Wink of Stella on the leaves, too.

There are still a few days to sign up for the November challenge (the last one of the year) if you fancy being a link in the chain. It's lovely to get a special hand-made card as well as sending one you've made.

Stamps:
Time to Stamp (CHF, sadly no longer with us)
Falling Leaves (Tim Holtz/Stampers Anonymous)
Vintage Flourish and Dinkie Vintage Flourish (Indigo Blu)

Paper:
Bristol board

Ink:
Brilliance by Tsukineko (Pearlescent Chocolate)
Tim Holtz Distress ink by Ranger (Antique Linen)

Other:
Copic markers
Low tack tape
Brown fineline marker
White paitn pen by Posca
Clear Wink of Stella pen

Thanks for stopping by!

Sunday, 5 November 2017

Autumn Leaves

I'm doing my usual last-minute-minnie act here - today is the last day for this month's Song Title Challenge at the Craft Barn and I've just made my postcard this morning!

This month's song is Autumn Leaves. I have to confess it wasn't one I knew so off I went to YouTube. Mickie had recommended the Eric Clapton version but the one that really stood out for me was Eva Cassidy so it's her name I used on my card. Both song title and artist name are hand written into two of the leaves at bottom right.

I think this face has a rather wistful, meloncholy air about her which seemed perfect for somebody thinking about lost love. I did some masking and planned a one layer card but a dropped marker meant a little bit of camouflage became necessary so I've added a couple of extra leaves that have been cut out and stuck on.


Stamps:
Molly (Beeswax Stamps)
Autumn Leaves (Sheena Douglass)

Paper: Smooth white

Ink:
Adirondack dye ink by Ranger (Espresso)
Brilliance by Tsukineko (Pearlescent Chocolate)

Other:
Copic markers
Clear Wink of Stella
Fine line brown marker

Thanks for stopping by!

Friday, 28 October 2016

Sparkle and shine

It's challenge day on Daring Cardmakers - today's challenge has been set by Nat and she wants us to make our cards sparkle and shine this week - glitter, gems, metallic paints, sequins, anything with some shiny glitz!

This is one of those cards that looks a whole lot better in real life, for some reason I couldn't make a photo of it look terribly coherent!

I stamped a leaf with Flitter Glue on dark brown cardstock and used metal leaf in autumn colours once the glue was tacky. I did make two leaves but decided I only wanted one so I  used the second one to punch out some circles to use as dots around the leaf on the finished card.

The glitter strips are just double sided tape sheet trimmed to the widths I wanted with gold and copper glitters burnished onto the tape.

Tiny nail art gems have been my "go to" for years - two slightly different sizes and colours got used here. Keeping the sheen thing going, the sentiment is stamped in a pearlescent ink.

Although I've gone down the birthday route, shine and sparkle would give you a great starting point for a Christmas card or two so why not join in with the dare this week and add to your Christmas stash?!

Stamps:
Falling Leaves (Tim Holtz/Stampers Anonymous)
Say It Loud (Waltzingmouse Stamps - retired)

Ink: Brilliance by Tsukineko (Pearlescent Chocolate)

Other:
Flitter Glue by Indigo Blu
Easy Metal by Eberhard Faber
Fine glitter (copper and gold)
Nail art gems
Corner Chomper

Thanks for stopping by!

Friday, 7 October 2016

Autumn inspiration

I'm delighted to be guest designing with the Daring Cardmakers for October - the original cardmakers' challenge blog, still going strong after 10 years!

The first dare of the month means an inspiration photo and a challenge to choose at least three elements from it to kick start a creation. The lovely Gez has chosen this month's picture - pop over to the DCM blog to see it or check out the bottom of this post!

I dithered wildly and finally settled on making an autumnal birthday card for my brother. From the picture I chose the vivid leaves against a black background, the horse's mane (embroidery thread combed out to a fringe) and the silver rings of the bridle (the big eyelet).

Various Distress reinkers, Brushos and lots of water made a lovely multi-coloured mess all over a sheet of mixed media paper. Once dry I die cut a load of leaves and added a touch of clear Wink of Stella to some of them (probably clearer in the close up shot). For the base layer I drew a scribbly circle on black card with a glue pen and covered with gilding flake once tacky.


The eyelet holds the embroidery thread in place and the scribbled circle forms the basis of a partial wreath shape. I spent ages fiddling with leaf position and still ended up not entirely happy with the composition! A die cut circle with a stamped sentiment, inked edges and faux stitching finished it off.

Supplies:
Black and white cardstock
Mixed media paper by Hahnemuhle
Various Distress reinkers
Brushos
Leaves dies by Impression Obsession
Circle Nestabilities by Spellbinder
Sentiment from Big Day Today stamp set (Waltzingmouse Stamps, retired)
Versafine ink by Tsukineko (Onyx Black)
Distress ink by Ranger (Antique Linen)
Clear Wink of Stella pen
Skeleton leaves
Jumbo eyelet
Black embroidery thread 
Zig two way adhesive pen
Mega Flake by Indigo Blu (Chariot of Fire)
Black Fineline marker

The inspiration photo chosen by Gez


Thanks for stopping by!

Friday, 4 October 2013

Mists and mellow fruitfulness

...and not much blogging! I don't seem to have managed very much crafting to share just lately.

We've just had one of our occasional postcard swaps on Bubbly Funk though (the forum has moved!). We took inspiration from autumn this time and I made a card for Nicky.

I used a Sheena Douglass Paint Fusion stamp set but used them just like regular stamps rather than using them as a guide for the sort of folk painting they were designed for. I had a go at "borderless" colouring - I was pleased with the leaves but not quite convinved about the berries!

I added a bit of "texture" with a crackle stamp and that was it - completely flat for "naked" posting.

Nicky says the PO franked both sides - sigh. We've had very few mishaps with our postcards so I guess we should expect the odd one every now and again!

Stamps
Sheena Douglass Paint Fusion - Berries
Indigo Blu  - Crackle Glaze

Ink:
Tim Holtz Distress by Ranger - Antique Linen and Tumbled Glass
Versaine by Tsukineko - Onyx Black

Paper: smooth white

Other:
Copic Markers
Uni Posca white pen

I got Dina Kowal's Borderless Watercolouring tutorial a while back and that inspired me to have a go (although obviously I didn't watercolour). It's a nicely presented, photo-rich tutorial if you're looking for a good guide from somebody who knows her colouring onions!

Wednesday, 21 October 2009

Gingersnap Colour Challenge

It's the third challenge of the month during CHF's sponsorship of Gingersnap - that means it's time for a colour challenge! The colours this month were orange, green and brown.

Sticking with the month's overarching theme of harvest and using natural materials, here's my card. It had to be pumpkins really, didn't it? I stamped and masked a whole row to reduce the amount of cutting out (you only have to do the top and bottom edge this way rather than cutting round each and every pumpkin!).

I used a sentiment stamp from the set to create a little interest on the green panel and the Fine Lines backgrounder on the brown because it makes me think of corduroy fabric which I think is very cosy and autumnal!

In a bid to break free from raffia and jute, my natural material this week is skeleton leaves. They do stick out from the edges of the card but they're delicate and filmy enough that it was hard to capture that on camera.

Stamps (Cornish Heritage Farms):
Happy Harvest (General Motors line)
Fine Lines backgrounder


Paper:

DCWV (green)
Brown from the scraps box
Simply Smooth


Ink:

Adirondack dye ink by Ranger (Espresso)

Tim Holtz Distress ink by Ranger (Peeled Paint)

Other:

Copic markers
Skeleton leaves
Corner Chomper

Sandpaper


Thanks for stopping by, hope you enjoyed the card!

Wednesday, 14 October 2009

Gingersnap branches!

It's Gingersnap challenge time again! The second challenge of the month is the "Spicy Supply" challenge and the supply this month is brads. I actually doubled up here and did the Clean and Simple challenge from Splitcoaststampers too (it's a technique challenge this week - thumping!).

What's thumping? Well, basically you ink up your stamp and then "thump" a marker over the surface of it to introduce some random colour variation. (ETA: Use the side of the nib to thump so that you don't run the risk of damaging the tip.) I used Caramel ink and a red marker for some autumnal tones in my branches. The brads provide corner accents for a stitched frame.

The theme running the whole month of challenges at Gingersnap is harvest and the use of natural materials. I guess my harvest connection is a bit slim this week but my colours are right! I've used jute garden twine as my natural material - just a wee bit to tie the base of the branches and hold the sentiment tag.

Stamps (Cornish Heritage Farms):
Silhouette Blooms I (Kim Hughes Collection)


Paper:
Watercolour

Ink: Adirondack dye ink by Ranger (Caramel and Espresso)

Other:
Tombow marker (red)

Sewing machine and thread

Antique copper brads (Making Memories)

Tags Trio dies by Spellbinder
Slot punch

Jute garden twine


Thanks for stopping by, hope you enjoyed the card!

Sunday, 11 October 2009

Autumnal Thanks!

I needed to make a thank you card and a had a couple of things churning around in my head that got translated into this project!

Hels posted a card made with a technique using spray starch and Perfect Pearls and the Tanda Teaser challenge this week was a colour combo - russet and gold.

My first play with the starch was a bit feeble so I Googled and found a posting on a forum that made me think I should have just dumped the Perfect Pearls straight on the foamy starch rather than waiting for the bubbles to subside. Much better! Then rather than doing the embossing technique that inspired me in the first place, I decided to cut a couple of leaves as embellishments from my pearl covered piece. I used an embossing stylus to give them some "oomph" by making lines for veins on the front of the leaf and then flipping it over and using little circular motions to dome out the sections between the veins.

The final element churning around in my head was that I've been loving the way Julia Stainton uses this freesia stamp in a kind of "supporting role" way rather than necessarily making it the star of the show so the stamping on the sentiment panel was inspired by that.

Stamps (Cornish Heritage Farms):
Freesia
Fancy Thank You
Fine Houndstooth Scrapblock®

Paper:
Cryogen white
Black (for the leaves)

Ink:
Adirondack dye ink by Ranger (Espresso and Latte)

Other:
Labels Four Nestabilities by Spellbinder
Pearls by Kaiser (tinted with Copic marker)
Vintage Lace
Grosgrain ribbon
Skeleton leaves
Spray starch
Perfect Pearls (Copper and Gold)
Sewing machine and thread
Thanks for stopping by!

Wednesday, 7 October 2009

Autumn Harvest

CHF have teamed up with Gingersnap Creations this month for an October full of challenges! For the full month we'll be throwing the spotlight on natural materials in our creations alongside the weekly themes.

The first challenge of the month is always the Chestnut Theme challenge and this month's theme is, appropriately, harvest.

I stamped the Saturday Evening Post Fall Harvest image and then coloured and cropped out just the lower portion of it (I dithered about this as I absolutely love the sweetcorn that's hanging at top right of the image but I had a landscape orientation fixed in my head for some reason so they had to go!).

I used burlap ribbon and raffia as my natural materials - the burlap came from a Christmas wreath a couple of years back. I entrusted the job of buying one to DH and he came back with a very upscale affair with dried seed heads and walnuts and stuff in amongst the evergreens - a big burlap bow finished it off so I "salvaged" that as soon as the Christmas decorations came down!

Stamps (Cornish Heritage Farms):
Fall Harvest (Saturday Evening Post line)
Sentiment from Fall Harvest set (All Things Considered line)

Paper:
Simply Smooth
Textured watercolour for card base

Ink:
Adirondack dye ink by Ranger (Espresso)
Tim Holtz Distress ink by Ranger (Vintage Photo)


Other:

Copic markers

Burlap ribbon
Vintage button
Raffia
Sewing machine and thread

Gingersnap is a fun challenge blog with an emphasis on "no stress" and any kind of papercrafting goes so whether you're into cards, scrapbooking, altered art, inchies, ATCs, moos or whatever, why not play along and get into the harvest spirit?

Thanks for dropping by today, hope you enjoyed the card!

Friday, 21 August 2009

Pile o' pumpkins!

I know it's still summer (such as it's been) but autumn is just around the corner and my organic veg box delivery this week contained a small pumpkin so I reckon this set of stamps is timely! "Fall Harvest" is the latest of the General Motors releases and although there's the obligatory truck on the sheet, there's also lots of fabulous veggie stamps!

The pumpkin was just crying out to be piled up in a great big pile of orange goodness! It's a really easy shape to cut so making masks is easy and, as ever, I just pop them into the case with the stamp set so I can reuse them and the cutting out effort is a one-off (at least until they get so tatty that they become unusable!).

Kraft cardstock has a great look and feel for autumn projects and raffia just seemed like the right kind of finishing touch somehow.

Stamps (Cornish Heritage Farms):
Happy Harvest (General Motors line)

Paper:
Simply Smooth
Kraft

Ink: Adirondack dye ink by Ranger (Espresso)

Other:
Copic markers
Inkssentials white pen by Ranger
Natural raffia
Tags trio dies by Spellbinder
Sewing machine and thread
Corner Chomper

I had more fun with this set for a Splitcoast technique challenge this week. I love resist techniques and Lynn pointed us to a couple of blogs with a leafing pen resist tutorial (Carol who in turn got it from Trish Bee).

Now, my Krylon nib is a little, ahem, frayed. That meant I found it impossible to get a pattern I liked as I was trying for a small scale pattern with a broad and tattered nib. So I "refined" the technique by embossing my watercolour paper in a Cuttlebug folder, used the Krylon on the raised bits, ironed it flat again and then carried on as described in the tutorial.

The pumpkin came out again along with a couple of ears of corn, some textured card and some stitching to make a touchy-feely kind of card which seems about right for autumn to me!

Stamps (Cornish Heritage Farms):
Happy Harvest (General Motors line)

Paper:
Watercolour
Kraft
Bazzill Monochromatics (Yellow Green pack)

Ink:
Adirondack dye ink by Ranger (Espresso for stamping plus Lettuce and Pesto reinkers)

Other:
Cuttlebug D'vine swirls embossing folder
Krylon leafing pen (copper)
Copic markers
Mini mister
Sewing machine and thread
Corner Chomper

Thanks for stopping by, hope your weekend has more summer than autumn in it! There'll be more fruit and veg next week in a completely different style - got to keep up your five a day, you know ;)