Miri has set the challenge for us over at Daring Cardmakers this week - she'd like to see us using a bead or beads on our cards.
I found some tiny seed beads in my stash and this background was lying on my desk and the colours seemed to go. To me it said "seascape" so that's what happened. The beads are providing a bit of texture and sparkle - they're just sprinkled onto some Glossy Accents.
The fish have glittery scales if you get the light right - courtesy of clear Wink of Stella pen. I've left it with no sentiment so it can be an all-purpose card!
The background is one I made for a mixed media challenge at Splitcoast a few weeks back that's a slight twist on the old shaving foam marbling technique. Details here if you fancy a go!
Stamps:
Under the Sea (Darkroom Door)
Paper:
Smooth white
Oxidised shaving foam background (on premium weight copy paper)
Ink:
Brilliance (Graphite black, Pearlescent Ivy)
Distress Oxide (Cracked Pistachio)
Distress reinkers (Broken China, Salty Ocean, Blueprint Sketch - for the background technique)
Other:
Seed beads
Glossy Accents
Wink of Stella (Clear)
Fineline marker
Thanks for stopping by!
Friday, 21 September 2018
Friday, 14 September 2018
Emboss it
Ruth has set the challnge for us over at Daring Cardmakers this week - she'd like us to use any sort of embossing on our projects.
I decided to heat emboss rather than use a folder, using white powder on a kraft base.
The clear Wink of Stella has made the petals look a bit murky on the photo but it's a pretty effect in real life - a bit of shimmer over very simple shading.
A very simple card, even the embellishing dots are stamped/embossed (there are three sizes of circle stamp in the Hero Arts set) and the tiny ones added with a white pen - light, flat and easy to post!
Stamps
Rose Bloom by Stampendous
Happy Stamp & Cut by Hero Arts
Paper:
Kraft
White
Ink:
Versamark by Tsukninko
Brillance by Tsukineko (Pearlescent Chocolate)
Other:
Detail white embossing powder
Copic markers
Clear Wink of Stella pen
White paint pen by Posca
Corner Chomper
Thanks for stopping by!
I decided to heat emboss rather than use a folder, using white powder on a kraft base.
The clear Wink of Stella has made the petals look a bit murky on the photo but it's a pretty effect in real life - a bit of shimmer over very simple shading.
A very simple card, even the embellishing dots are stamped/embossed (there are three sizes of circle stamp in the Hero Arts set) and the tiny ones added with a white pen - light, flat and easy to post!
Stamps
Rose Bloom by Stampendous
Happy Stamp & Cut by Hero Arts
Paper:
Kraft
White
Ink:
Versamark by Tsukninko
Brillance by Tsukineko (Pearlescent Chocolate)
Other:
Detail white embossing powder
Copic markers
Clear Wink of Stella pen
White paint pen by Posca
Corner Chomper
Thanks for stopping by!
Sunday, 2 September 2018
Link in the chain
Visiting the lovely Jo's blog a while back I noticed a post about the Card Chain Challenge. It struck me as a such a lovely idea I signed up for the August chain.
From the options for the month I chose fruit and stencilling. I've recently got hold of an old Stampin' Up! set called Sun Ripened, primarily for this lovely rapsberry image. Raspberries have always been a family favourite and my folks have always grown them so when I saw a card made with this stamp, I just had to have it!
My card has gone to Janet in Mauritius - I have no idea whether raspberries seem very ordinary and pedestrian there, I'm thinking fruit might be quite different!
I’m not sure you can tell from the photo but the berries and leaves are slightly raised - I put the card on a piece of craft foam and used a fine tipped stylus to draw round the image then flipped it over and used the line to show me where to push the image out with a bigger stylus.
Stamps:
Sun Ripened (Stampin' Up! - long retired)
Paper:
Ribbed kraft
Ink:
Adirondack dye ink by Ranger (Espresso)
Adirondack pigment by Ranger (Snowcap)
Other:
Copic markers
Prismacolor pencils
White paint pen by Posca
Cressida stencil (Memory Box)
Phrases 2 dies (Spellbinder)
Corner Chomper
Charcoal pencil
Thanks for stopping by! The sign-up for the September chain is open for a few more days - details here if you fancy taking part!
From the options for the month I chose fruit and stencilling. I've recently got hold of an old Stampin' Up! set called Sun Ripened, primarily for this lovely rapsberry image. Raspberries have always been a family favourite and my folks have always grown them so when I saw a card made with this stamp, I just had to have it!My card has gone to Janet in Mauritius - I have no idea whether raspberries seem very ordinary and pedestrian there, I'm thinking fruit might be quite different!
I’m not sure you can tell from the photo but the berries and leaves are slightly raised - I put the card on a piece of craft foam and used a fine tipped stylus to draw round the image then flipped it over and used the line to show me where to push the image out with a bigger stylus.
Stamps:
Sun Ripened (Stampin' Up! - long retired)
Paper:
Ribbed kraft
Ink:
Adirondack dye ink by Ranger (Espresso)
Adirondack pigment by Ranger (Snowcap)
Other:
Copic markers
Prismacolor pencils
White paint pen by Posca
Cressida stencil (Memory Box)
Phrases 2 dies (Spellbinder)
Corner Chomper
Charcoal pencil
Thanks for stopping by! The sign-up for the September chain is open for a few more days - details here if you fancy taking part!
Friday, 31 August 2018
Travelogue
Kathy is setting the challenge over at Daring Cardmakers this week - she’s sending us on a travelogue! Anything to do with travel whether that be aeroplanes or suitcases, cars or compasses - what does “travel” say to you?
I’m sharing a card I actually made for an event at Splitcoast Stampers recently since my skills of organisation have gone to pot! I can’t tell you what the challenge was there but I thought it fit the travel theme so here it is!
I think my adventurer has gone for a swim in a beautiful lake - let’s hope those boots are still there when he gets back!
There’s a useful tutorial here to help if you fancy stretching your stamps and putting them into watery or icy settings!
Stamps:
Combat Boots by Deep Red Stamps
Sentiment from Essential Messages by Hero Arts (I think it's retired)
Paper:
Bristol board
Ink:
Brilliance by Tsukineko (Graphite Black)
Tim Holtz Distress ink by Ranger (Tumbled Glass, Vintage Photo, Peeled Paint)
Other:
Copic markers
White paint pen by Posca
Corner Chomper
MISTI to help me get the sentiment straight!
Thanks for stopping by!
I’m sharing a card I actually made for an event at Splitcoast Stampers recently since my skills of organisation have gone to pot! I can’t tell you what the challenge was there but I thought it fit the travel theme so here it is!
I think my adventurer has gone for a swim in a beautiful lake - let’s hope those boots are still there when he gets back!
There’s a useful tutorial here to help if you fancy stretching your stamps and putting them into watery or icy settings!
Stamps:
Combat Boots by Deep Red Stamps
Sentiment from Essential Messages by Hero Arts (I think it's retired)
Paper:
Bristol board
Ink:
Brilliance by Tsukineko (Graphite Black)
Tim Holtz Distress ink by Ranger (Tumbled Glass, Vintage Photo, Peeled Paint)
Other:
Copic markers
White paint pen by Posca
Corner Chomper
MISTI to help me get the sentiment straight!
Thanks for stopping by!
Labels:
DCM,
deep red stamps,
masculine,
olc (one layer card)
Friday, 17 August 2018
What’s cooking?
It’s my turn to set the challenge over on Daring Cardmakers this week. I’d like to see images of food or see you use something from the kitchen to make your project. Extra brownie points if you manage both, a food image and use of a kitchen item!
I raided the kitchen for food colouring and washing up liquid and had some fun making bubble backgrounds. I guess I could count the disposable plate, too!
I had some black food colouring that has been in my pantry forever (it had a best before date in 2003!) and I guessed it might look either grey or brown used for this technique. I think it turned out quite a stylish colour and I made a little stack of prints on different sorts of paper so I've got some to use in future projects.
The pear I chose for my food image is one of the very first stamps I bought and is a “no name” design. I used neutral Copics to keep the colour palette quite masculine, cut it out and stuck it down with gel glue so the leaves are a bit raised. A die cut and stamped sentiment and a doodled frame finish it off.
If you fancy having a go at bubble backgrounds you just need a colouring medium with plenty of pigment (ink, watercolour or acrylic paint, or food colouring should all work). Add it along with a bit of water and a generous squirt of washing up liquid onto a plate (I used a disposable one so I didn’t have to worry about staining) and stir it up. Use a straw to blow into the mixture and make plenty of bubbles - be careful not to suck! Then gently swipe paper over the bubbles so that they pop against the surface. You can repeat the blowing of bubbles as many times as you like and keep layering the prints until you have the effect you want. Every piece will be unique.
Stamps:
Pear (unnamed maker)
Happy Stamp n Cut and Essential Messages (Hero Arts)
Paper:
Bristol board
Ink:
Brilliance by Tsukineko (Pearlescent Chocolate)
Other:
Black food colouring
Washing up liquid (that’s dish soap to my American friends)
Copic markers
Brown fine liner
Pinflair glue gel
Thanks for stopping by!
I raided the kitchen for food colouring and washing up liquid and had some fun making bubble backgrounds. I guess I could count the disposable plate, too!
I had some black food colouring that has been in my pantry forever (it had a best before date in 2003!) and I guessed it might look either grey or brown used for this technique. I think it turned out quite a stylish colour and I made a little stack of prints on different sorts of paper so I've got some to use in future projects.
The pear I chose for my food image is one of the very first stamps I bought and is a “no name” design. I used neutral Copics to keep the colour palette quite masculine, cut it out and stuck it down with gel glue so the leaves are a bit raised. A die cut and stamped sentiment and a doodled frame finish it off.
If you fancy having a go at bubble backgrounds you just need a colouring medium with plenty of pigment (ink, watercolour or acrylic paint, or food colouring should all work). Add it along with a bit of water and a generous squirt of washing up liquid onto a plate (I used a disposable one so I didn’t have to worry about staining) and stir it up. Use a straw to blow into the mixture and make plenty of bubbles - be careful not to suck! Then gently swipe paper over the bubbles so that they pop against the surface. You can repeat the blowing of bubbles as many times as you like and keep layering the prints until you have the effect you want. Every piece will be unique.
Stamps:
Pear (unnamed maker)
Happy Stamp n Cut and Essential Messages (Hero Arts)
Paper:
Bristol board
Ink:
Brilliance by Tsukineko (Pearlescent Chocolate)
Other:
Black food colouring
Washing up liquid (that’s dish soap to my American friends)
Copic markers
Brown fine liner
Pinflair glue gel
Thanks for stopping by!
Labels:
DCM,
Male birthday,
masculine,
rubber stamping
Friday, 10 August 2018
Life on the ocean wave
Shabneez is setting the challenge over at Daring Cardmakers today and she'd like us to go nautical.
A few years back my hubby spotted some interesting printing blocks on a stall in Covent Garden and bought a couple for me including this ship. I'm not sure how they're intended to be used but I found that with a little bit of jiggery-pokery it's possible to run them through the Big Shot as a kind of letterpress. The printing lines are etched into a metal plate so you can't just use it like a rubber stamp, it needs some pressure.
I've added just the slightest hint of colour around the ship using dots of Copic marker that get more widely space as they get further out. I thought the plank embossing could represent the ship's deck.
Supplies:
Printing block
Sentiment words from Say It Loud (Waltzingmouse Stamps, no longer with us)
Bristol board
Versafine by Tsukienko (Onyx Black)
Memento Luxe by Tsukineko (Love Letter)
Copic marker
Silver mirror card
Pinewood Planks embossing folder (Stampin' Up!)
Rectangle Nestabilities by Spellbinder
White Enamel Accents by Ranger
Corner Chomper
Thanks for stopping by!
A few years back my hubby spotted some interesting printing blocks on a stall in Covent Garden and bought a couple for me including this ship. I'm not sure how they're intended to be used but I found that with a little bit of jiggery-pokery it's possible to run them through the Big Shot as a kind of letterpress. The printing lines are etched into a metal plate so you can't just use it like a rubber stamp, it needs some pressure.
I've added just the slightest hint of colour around the ship using dots of Copic marker that get more widely space as they get further out. I thought the plank embossing could represent the ship's deck.
Supplies:
Printing block
Sentiment words from Say It Loud (Waltzingmouse Stamps, no longer with us)
Bristol board
Versafine by Tsukienko (Onyx Black)
Memento Luxe by Tsukineko (Love Letter)
Copic marker
Silver mirror card
Pinewood Planks embossing folder (Stampin' Up!)
Rectangle Nestabilities by Spellbinder
White Enamel Accents by Ranger
Corner Chomper
Thanks for stopping by!
Labels:
DCM,
Male birthday,
masculine,
sea,
stampin up
Friday, 3 August 2018
August Elements
I chose lemon slice, raised and self-coloured writing (inspired by the tonic bottle), gold accents and bubbles.
I thought this would be a fun card for a G&T-drinking friend!
The lemon slice is from a bundle of vintage botanical images I got from a seller on Etsy. They'd be ideal for vintage work as they're "raw" scans from very old books so they have background colour but you can do some digital clean-up or get the scissors out and use them for collage etc. At under £4 for over 500 images I decided it was worth a punt!
I printed the slice and coloured it with Copic markers and a white paint pen, cut it out and popped it up slightly. Gold lines are done freehand with a glue pen and covered in MegaFlake once tacky. The gold "bubbles" are metal from a tomato paste tube, punched out with the two sides of my Crop-a-Dile. Rest the circles on some craft foam and dome with a stylus for cheap and cheerful embellishments!
Supplies:
Vintage printable (Botanicals from Etsy seller)
Happy Stamp & Cut and part sentiment from Essential Messages (Hero Arts)
Copic markers
White paint pen by Posca
Wink of Stella pen (clear)
Metal from tomato paste tube
Flitter Glu and Chariot of Fire Mega Flake (Indigo Blu)
Sakura Quickie glue pen
Pinflair glue gel
Corner Chomper
Here's our inspiration picture this month.
Thanks for stopping by!
Labels:
CAS (clean and simple),
DCM,
digital image,
hero arts,
tomato paste tube
Friday, 27 July 2018
Hello and welcome!
It’s Svenja’s turn to challenge us over at Daring Cardmakers this week and she’d like us to focus on welcomes - a new baby, new colleague, new neighbour etc.
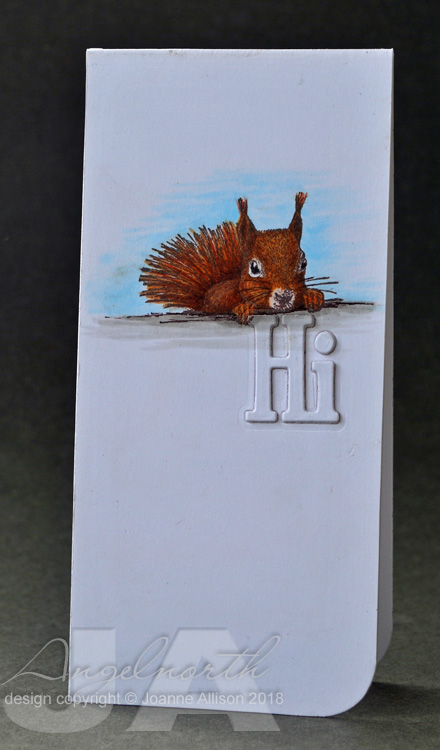
I’ve gone clean and simple with a scrapling (I’m determined to make a dent on the pile of scrapling-sized trimmings I have!). We live right on the edge of an area that still has red squirrels even though the greys are making inroads into the territory. We’re encouraged to report sightings of greys and one of our neighbours is a squirrel warden!
All of which made this stamp a perfect choice for a card to say “hello, welcome to the neighbourhood”! I’m sure he’s a red squirrel as he has those lovely little tufty bits on his ears and the greys don’t have those! Sadly I don’t have a die to cut the word welcome so I settled for stamping it on the inside.
Stamps:
Squirrel by Carabelle Studio
Paper:
Bristol board
Ink:
Brilliance by Tsukineko (Pearlescent Chocolate)
Other:
Copic markers
Black fineliner
Phrases 2 dies by Spellbinder
Corner Chomper
Thanks for stopping by!
I’ve gone clean and simple with a scrapling (I’m determined to make a dent on the pile of scrapling-sized trimmings I have!). We live right on the edge of an area that still has red squirrels even though the greys are making inroads into the territory. We’re encouraged to report sightings of greys and one of our neighbours is a squirrel warden!
All of which made this stamp a perfect choice for a card to say “hello, welcome to the neighbourhood”! I’m sure he’s a red squirrel as he has those lovely little tufty bits on his ears and the greys don’t have those! Sadly I don’t have a die to cut the word welcome so I settled for stamping it on the inside.
Stamps:
Squirrel by Carabelle Studio
Paper:
Bristol board
Ink:
Brilliance by Tsukineko (Pearlescent Chocolate)
Other:
Copic markers
Black fineliner
Phrases 2 dies by Spellbinder
Corner Chomper
Thanks for stopping by!
Friday, 20 July 2018
Summertime
Miri is setting the challenge for us this week at Daring Cardmakers - she’d like us to take advantage of the summer weather and get outdoors. Picnics, sunbathing, tennis, waterskiing, a stroll along the prom with an ice cream... what would you choose to do?
I’ve opted for a spot of beach combing with some stamped shells and die cut netting. A piece from my scraps pile provides a splashy blue background and a smattering of sequins finishes it off.
Stamps:
Antique Engravings and Say It All by Hero Arts (I suspect both sets are retired)
Seaside by Crafty Secrets (no longer with us)
Paper:
Bristol board
Unidentified inky piece from scraps pile!
Ink:
Brilliance by Tsukineko (Pearlescent Chocolate)
Other:
Copic markers
Netting die cut (Marianne Design Craftables)
Sequins
Corner Chomper
Thanks for stopping by!
I’ve opted for a spot of beach combing with some stamped shells and die cut netting. A piece from my scraps pile provides a splashy blue background and a smattering of sequins finishes it off.Stamps:
Antique Engravings and Say It All by Hero Arts (I suspect both sets are retired)
Seaside by Crafty Secrets (no longer with us)
Paper:
Bristol board
Unidentified inky piece from scraps pile!
Ink:
Brilliance by Tsukineko (Pearlescent Chocolate)
Other:
Copic markers
Netting die cut (Marianne Design Craftables)
Sequins
Corner Chomper
Thanks for stopping by!
Labels:
CAS (clean and simple),
DCM,
die cuts,
hero arts,
mixed media,
seaside
Friday, 13 July 2018
A sporting chance
Kathy has set this week's challenge over at Daring Cardmakers. She's like us to be inspired by the summer of sport happnening and make a card with a sporting theme.
I'm possibly the least sports-oriented person ever. DH's grandsons, however, play football, cricket, ice hockey etc and I have a nephew and friend's son who do martial arts so kids card it was...
The football was simple clip art, I shaded it with Copic markers, cut out with a circle die and popped up slightly with gel glue. Other than that it's just a bit of inking on the green panel and a heat embossed sentiment.
Supplies:
Clip art football
Sentiment from Essential Messages (Hero Arts)
Green cardstock
Bristol board
Tim Holtz Distress ink by Ranger (Peeled Paint)
Versamark by Tsukineo
Detail white emobssing powder
Copic markers
White gel pen
Black fineliner
Thanks for stopping by!
I'm possibly the least sports-oriented person ever. DH's grandsons, however, play football, cricket, ice hockey etc and I have a nephew and friend's son who do martial arts so kids card it was...
The football was simple clip art, I shaded it with Copic markers, cut out with a circle die and popped up slightly with gel glue. Other than that it's just a bit of inking on the green panel and a heat embossed sentiment.
Supplies:
Clip art football
Sentiment from Essential Messages (Hero Arts)
Green cardstock
Bristol board
Tim Holtz Distress ink by Ranger (Peeled Paint)
Versamark by Tsukineo
Detail white emobssing powder
Copic markers
White gel pen
Black fineliner
Thanks for stopping by!
Labels:
DCM,
hybrid,
kids,
Male birthday
Subscribe to:
Posts (Atom)