Thursday, 22 December 2011

Christmas Joy

The December challenge over at Tando Creative is "Winter Festivals" - whether you celebrate Christmas, Hannukah, Yule etc or just the beauty of your surroundings at this time of year.

I combined a wavy twinchie and a medium sized wonky tree to make a little festive brooch. The twinchie has been painted black, beaten up with an embossing stylus and coated with Rub n Buff. I painted the tree with pearlescent acrylic paint and then added a garland of hot pink microbeads with Glossy Accents. Silver microbeads add more texture at the base.

I made the sentiment piece by melting a little UTEE on a non-stick sheet and pressing a stamp into it and "antiquing" with some black paint. I glued it in place to finish the piece off.

Supplies:
Wavy Twinchie and Wonky Trees grab bag (Tando Creative)
Black acrylic paint
Rub n Buff by Amaco (Silver Leaf)
Siver UTEE
Sentiment from Season's Greetings stamp set (Technique Tuesday)
Microbeads (hot pink and silver - acrylic nail art supplies)

If you're doing last minute crafting, why not enter the December challenge and be in with a chance of winning a prize?

Thanks for stopping by, hope you have a wonderful Christmas!

Monday, 19 December 2011

Hippo Birthday

I needed a birthday card for a wee boy so I took Kathy's December sketch from the Sketch File as my starting point. It's a fairly loose interpretation - I treated the embossed word blocks as four of the five strips in the sketch and added the recipient's name as the fifth.

I did try putting a circle behind the hippo but it looked better without.

Stamps: Heloise Hippo (High Hopes)

Paper: Red, white, navy

Ink: Brilliance by Tsukineko (Graphite Black)

Other:
Typeset decorative strip die (Tim Holtz Alterations/Sizzix)
Copic markers
Tracing Wheel
Corner Chomper (We R emory Keepers)
Birthday embossing folder (Cuttlebug)


Thanks for stopping by - hope your Christmas preprations are all under control!

Tuesday, 13 December 2011

Tim Tag 9

Part of the festive season run up for many papercrafters these days includes Tim Holtz's 12 Tags of Christmas. I haven't been playing every day but I've had a go at the odd one or two. Here's my take on Day 9's tag.

I used Tim's double embossed technique for the background and the idea of a festive light source for the focal point and changed just about everything else! As my colours were darker, the whole thing was in danger of looking a bit dour so I added some torn cardstock snow layers to the base and kept my wording white rather than black.

I hand cut some holly leaves and spiky fronds to make a festive foliage arrangement for the top of the lantern and added a silk ribbon bow and some gems for a pop of red.

The lantern itself was coloured black with a marker and then had the tiniest scraping of Rub n Buff added to give it an antiqued metal finish. A tiny bit of gesso snow finishes the top.

Supplies:
Chipboard lantern from Lantern Set (Tando Creative)
Perfect Paisley Scrapblock stamp (retired CHF)
Typeset alpha die (Alterations/Sizzix)
Tim Holtz Distress ink (Peeled Paint, Fired Brick, Vintage Photo)
Cuttlebug die cut ornate corner
Rub n Buff (Gold Leaf)
DCWV cardstock
Copic markers
Gesso
White cardstock
Glamour Dust glitter
Glossy Accents


Thanks for stopping by!

Friday, 9 December 2011

White Christmas

Glenda Waterworth is hosting a "white Christmas" challenge on her blog with a great prize up for grabs. For each entry to the challenge, she's adding £1 value to a gift voucher to spend on Chocolate Baroque stamps - check out the blog for full details here.

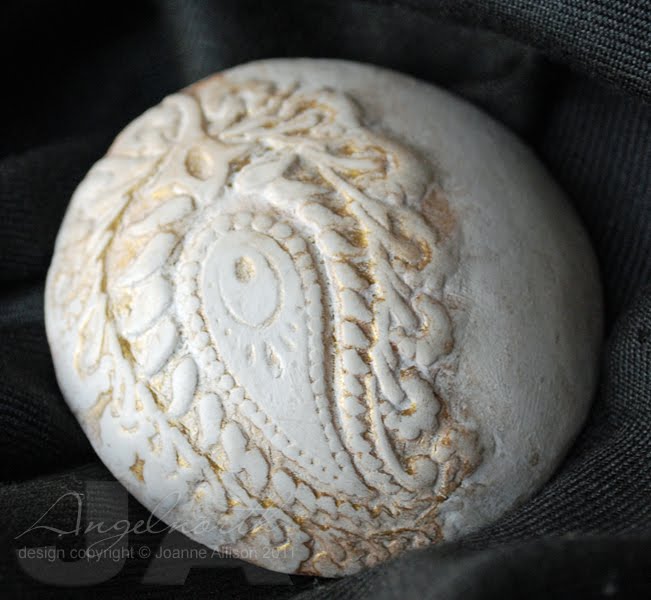
I was in the mood to play with some polymer clay so I've taken a completely left-field approach here and made something white to give as a Christmas gift - hope that's within the spirit of the challenge!

I had some fun trying out something new with this - making a mould from a stamp to get an "outy" rather than an "inny" on my finished piece. When you press a stamp into polymer clay you get depressions where you would have ink if you stamped on paper. With this technique, you press the stamp into some scrap clay and bake it and then use that to make the textured impression on your finished piece. I pressed mine into white clay, cut it out with a cookie cutter and then baked it over a dud lightbulb to get a dished shape on the finished piece. You need to add a little "platform" of clay inside so that there's a flat surface if you want to add a brooch back when you do this but you could also make a hole and use it as a pendant piece if you wanted.

I spritzed some Glimmer Mist on and let it pool in the crevices. I think the finished piece has a bit the look of something you'd see on ornate plasterwork ceilings!

Materials:
Nature's Paisley stamp set (Chocolate Baroque)
Sculpey Premo polymer clay
Glimmer mist (Antique Brass)
Clay tools (acrylic roller, cookie cutter)
Brooch back


There's nearly a week left to have a play if you fancy joining in with the White Christmas challenge - remember the more players there are, the bigger the prize pot for the random draw! Details here.

Thanks for stopping by!

Wednesday, 23 November 2011

Let it snow!

It's challenge time again at Tando Creative. There's an inspiration board to work from this month with blues and browns.

By this time last year I think we were already thoroughly sick of snow but as it's unseasonably mild at the moment, I thought I could risk a snow-themed project without causing the horrors!

I've inked the white board of the frame with Brilliance and stamped the snowflakes on the chocolate brown backing with the same ink. A stamped and inked wavy domino is attached with jump rings for the sentiment and a cheery snowman finishes it off.

Connecting smaller shapes together is a fun way to use chipboard and lots of the pieces in the Tando range share measurements in one direction or the other so it's easy to coordinate.

Supplies:
Karen's Frames - Gothic Arch and Wavy Domino (Tando Creative)
Compliments of the Season stamp set (Waltzingmouse Stamps)
Dancing Snowman stamp (CHF, retired)
Brilliance by Tsukineko (Sky Blue)
Versafine by Tsukineko (Vintage Sepia)
Coloured pencils
Jump rings
Crop a Dile


If blue and brown tickles your fancy, there's still a week left to enter the challenge and be in with a chance of winning a lovely Tando prize (you get to pick the goodies!) - details of the challenge are here.

Thanks for stopping by!

Thursday, 17 November 2011

Dragonfly dreams

Carol's been doing a class on the Tando Creative Online Classes blog over the last four weeks. I've played along but, of course, I've done it my own way! Carol used the six inch square frame, mine is the one that's about 88mm square.

As I started out with a smaller frame, I've simplified quite a lot to avoid a very "busy" finished product. I used a lot of Carol's class techniques for the various elements, though (and added a bit of "me" as I went along!).

The basic frame preparation is just as outlined in Carol's first session - I chose not to heat the paste to make it bubble though.

Week 2 and I started to go off piste a bit! I did the basic technique with the stand (although I used a large background stamp rather than a swirl) and sort of followed the background insructions. My main difference was that I sponged gesso through my mask and chose a much smaller scale pattern (the sequin waste mask) to go with my smaller project. I only partially outlined some of my sponged dots.

Week 3 was easy for me - Carol made lots of fab embellishments but I decided the smaller frame couldn't handle very much so I just made the dragonfly! As I wasn't doing all the inchies and fragments etc (actually this frame is not wide enough to take them) I decided to add some extra textural interest by doing the beaten metal effect around the top right. To achieve this look, just bash the heck out of the chippie with an embossing stylus and then very lightly apply Rub n Buff.

The final week brought all the elements together. Again, I simplified and just stamped onto my prepared background, added a little bit of white gel pen to the plant's flower heads and attached the dragonfly with some florist's wire so that it floats free of the frame.

Supplies:
Square frame with stand and Bug Set 1 Sml (Tando Creative)
Sequin Waste mask (Tando Creative)
Plant from Nature Plate 1 (Indigo Blu)
Sentiment from retired CHF set
Crackle stamp
Black and green acrylic paints
Rub n Buff by Amaco (Silver Leaf)
Pearls (coloured with a Copic marker)
Perfect Pearls (Forver Green, Forever Blue, Patina Green)
Opalite inks (Orchid Ice and Cypress Frost)
Versafine ink (Onyx Black)
Distress inks (Tumbled Glass, Brocken China, Bundled Sage)
Inkssentials white pen by Ranger
Clear embossing powder
Gesso
Florist's wire


If you fancy having a go at you own version, all of Carol's instructions will stay up on the blog so we'd love to see you any time! Thanks for stopping by!

Tuesday, 15 November 2011

Silver snowflakes

Once again I'm hosting the challenge in the Crafty Secrets member forum over at Splitcoast and this week we're using pins in our projects.

I've gone for a dramatic look by heat embossing silver snowflakes on black and adding a framed sentiment. The felt die cut poinsettia came from a garland that was remaindered in a local supermarket a couple of years back - I'm still snipping the odd one off and using them!

Stamps:
Christmas Joy (Clear Art Stamps by Crafty Secrets)

Paper:
Black
Cryogen white
Silver

Ink:
Versafine by Tsukineko (Crimson Red)
Tim Holtz Distress ink by Ranger (Antique Linen)

Other:
Detail silver embossing powder
Felt die cut poinsettia
Spelldinder dies (snowflake and Labels Nine)
Pins
Rub n Buff by Amaco (Silver Leaf)
Pearl
Tracing wheel


Thanks for stopping by!

Tuesday, 18 October 2011

Sweet bee

It's my turn to host the challenge in the Crafty Secrets member forum over at Splitcoast Stampers. I'm asking people to go back to their ABCs - in stamper language that means Anything But a Card.

I made this little vintagey lavender sachet, stamped with the branches and bee and a touch of colour added with Copics. Cotton curtain lining makes a good base to stamp on for this kind of thing - close woven and smooth but inexpensive.

My experience has been that Copics don't stand up well to washing but for this kind of project that won't be washed, it's a quick and convenient way of adding colour. You do need a light touch though as the ink tends to travel along the fibres of the fabric.

I added some vintage lace, mother of pearl button and a seam binding hanging loop to finish it off.

Stamps: Queen Bee (Crafty Secrets)

Ink: Versacraft by Tsukineko (black)

Other:
Cotton fabric
Copic markers
Vintage lace
Vintage button
Seam binding
Lavender


Thanks for stopping by!

Saturday, 15 October 2011

Boo!

Our theme this month for the Tando Creative Challenge is "spooktastic" - why not come and play along and be in with a chance to win the prize this month (details, including a link to the rules to be eligible for the draw are here).

I think mine is probably more cute than spooky but it's Halloweeny either way!

I used a cut down Tetrapack (the brick shaped sort, not the square section one), painted it black and cut a window in the front. Using vellum in the window means it can be used as a lantern (battery operated tea light is safest since there's paper involved!) or you could fill it up with Halloween treats and use it as a gift bag. I embossed the spider web and accentuated it by using a white Posca pen on the back of the raised lines.

I used an embossing stylus and "drew" grooves in the pumpkin then added darker color there to accenuate the texture. I added a bit of acetate coloured with a black Copic behind his features so they show black in daylight but let light shine through if you use it as a lantern.

Supplies:
Pumpkins Small (chipboard by Tando Creative)
Empty Tetrapack carton
Black spray paint
Vellum
Webbing embossing plate by Fiskars
Copic Markers
Chipboard letters
Florists' wire


Thanks for stopping by - we'd love to see some of your spooktastic creations in the challenge if you have chance to play before the end of the month!

Friday, 14 October 2011

Birthday bird

I haven't played with the Daring Cardmakers for ages and seeing as I also wanted to make a card for this week's Crafty Secrets member forum challenge at Splitcoast (theme of Mother Nature) I decided to roll the two into one. Pushed for time though so I went with a one layer, clean and simple creation.

This fat bird was the reason I bought my first ever Crafty Secrets stamp set and I still love him! With this kind of minimal treatment, I think he makes a card that would be good for those tricky masculine occasions we never know quite what to do with!

A bold sentiment, a bit of ink sponged over some skeleton leaves and a tiny touch of colour with a couple of Copics is all that's going on here.

Stamps:
Bird Notes (Clear Art Stamps by Crafty Secrets)
Say it Loud (Waltzingmouse Stamps)

Paper:
Smooth white

Ink:
Adirondack dye ink by Ranger (Espresso)
Tim Holtz Distress ink by Ranger (Bundled Sage)

Other:
Copic markers
Skeleton leave
Corner Chomper


DCM's dare is sponsored this week by The Ribbon Reel - pop over for a chance to win a prize!

Thanks for stopping by!