Saturday 22 March 2014

Passage of time

Another slightly messier style card from me today - I did balance out a bit with a wide border though! This is a 6" square card and the mixed media panel is 4" square in the middle.

I've combined this week's Splitcoast Stampers Mixability challenge (use book print on your project) with the current Pan Pastel UK Challenge blog challenge to use three textures.

I used modelling paste with some plastic canvas. Once it was dry, I stamped the time sentiment with Versamark and used  Pan Pastel to colour over the paste and the stamping.

My second texture is the part circle cut from gold mountboard and dry embossed and the third is the star which is punched from tomato paste tube and beaten up with an embossing stylus then coloured with a Copic marker for a more copper tone. I used the same marker to make some neutral sequins and tiny pearls look coppery, too.

My French primer text came from the pack of paper ephemera I bought ages ago from a local trader who makes them up by putting together pages from books that are beyond hope in terms of being sold whole.

Stamps:
Clocks 3 by PaperArtsy
Essential Messages by Hero Arts

Paper: white and bitter chocolate

Ink: Versamark and Versafine Vintage Sepia

Other:
Maimeri Light Modelling Paste
Tomato paste tube metal
Fiskars squeeze punch - star
Uber embossing folder
Watch face
Sequins
Nail art pearls
Pan Pastel - Burnt Sienna Shade
Old book page
Scor-It board
Corner Chomper

Thanks for stopping by!


Friday 14 March 2014

Another mono printing adventure!

While thinking about mono printing for the current Craft Stamper challenge, I had an idea that might get me round my patterned paper problem - what happens if I incorporate a focal point on the print itself by using masks, I wondered?

This is what happened. I didn't get my masks quite right and ended up adding the small heart as a separate layer cut from another print but it basically worked!

I brayered red paint onto the acrylic block and pressed a background stamp into it then lifted a print. Then I did a layer of burnt umber and burnt sienna textured with plastic canvas and placed my two heart masks on there before pulling the print (I used acetate to cut my masks as it's a bit easier to handle than damp paper!).

Here's where I slipped up - for the final layer (which is white with a smidge of gold, textured with a very open weave, cheesecloth type fabric) I wanted to subdue the background heart by overprinting and leave the foreground one more vivid but I used the wrong mask so the big heart overlapped the small one! To rescue it, I did a second print with the the red paint and stamp (no layering this time) and die cut the smaller heart from that.

The flourish in the corners is stamped with gold ink and shows up differently at different angles (which makes it hard to photograph, sorry!). It's finished with a stamped and heat embossed sentiment, charcoal pencil drop shadows for both hearts and the small heart stuck down with some Pinflair glue gel for a little height.

There's still time to play along in the Craft Stamper challenge to use your acrylic block for some mono printing - you'll find all the details here and we'd love to see you!

Stamps:
Leaves #3 background stamp and sentiment (CHF, retired)
Vintage Flourish (Indigo Blu)

Ink:
Delicata Golden Glitz by Tsukineko, Versamark

Other:
Titanium white, true red, burnt umber, burnt sienna Americana acrylic paints by DecoArt
Dazzling Gold acrylic paint by DecoArt
Charcoal pencil
Detail black embossing powder
Sizzix primitive hearts die
Pinflair glue gel

Tuesday 11 March 2014

WMS - To Die For


I'm joining in with the Waltzingmouse Stamps Pajama Party for the first time - I finally managed to get things in order to get something made on the right day!

Challenge 1 is "To Die For" - Waltzingmouse has recently added their own Cutting Edge dies alongside the stamps and Claire's challenged us to use them in our creations.

I ended up doing something out of my comfort zone and probably not "typical" of WMS style! I actually intended to make something Christmassy with the lovely Bright Season Lantern die but of course I got distracted along the way - when cutting the lantern from kraft cardstock to use as a template, I noticed the "waste" from the centre of the lantern looked like an elegant vase or plant pot and that set me off in a totally different direction!

I've used a piece of paper that had been used to clean a painty brayer as my background with just a little doodling for a border and some splodgy white dots added through a stencil with a Posca pen (smeared while still wet) at top left.

I cut the top off a second "pot" with some pinking shears and added that as an extra detail, inking all the edges for a bit of depth. The "flower" is a heart cut with the smallest die from the "My Heart" set and coloured with Copic markers. I stamped leaves from Funky Flowers with acrylic paint for a splodgy look, cut them out and added them and a wire stem. Pot, heart and leaves are all stuck on with Pinflair glue gel for some dimension.

The sentiment is all from the Say It Loud set, snipped into individual words and finished with a little more doodling.

If you fancy playing along, you can upload entries for the Pajama Party until midnight tonight and there's a sketch challenge to play with for the rest of the week too - details here.

Supplies:
My Heart and Bright Season Lantern dies (Waltzingmouse Stamps)
Say It Loud and Funky Flowers stamp sets  (Waltzingmouse Stamps)
Acrylic paints
Brilliance Graphite Black ink
Distress Vintage Photo ink
Copic markers
Copic fineliner
Posca white pen
Sequin waste mask (Tando Creative)
Pinking shears
Florist wire 
Pinflair glue gel

Thanks for stopping by!


Friday 7 March 2014

Experimenting with mono prints!

The Craft Stamper blog challenge has gone monthly so that means it's time for a new one!

This time we're using an acrylic block for mono printing (effectively using the block like a Gelli plate). I've resisted the lure of the Gelli, mostly because I suspected I'd make prints I liked and then my PPP (patterned paper problem) would kick in and I'd have no idea what to do with them.

When Trish told us what this month's challenge would be, I decided I'd have a go. Not sure if I set myself up for it but I proved myself right - made prints I liked and then couldn't use them! This is the attempt I'm happiest with.

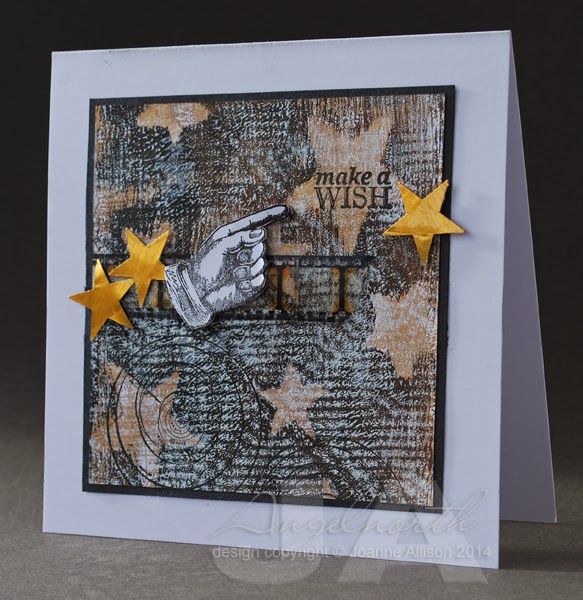
I used Americana craft acrylic paints on the biggest acrylic block I own. If I remember rightly I did a layer of gold with plastic canvas pressed into it and lifted before taking a print, a layer of burnt umber and black with star masks scattered over and finally a layer of white with a piece of lace pressed in and lifted before taking the print (you can see the large diamond design of the lace as well as the overall texture if you let your eyes relax a bit!).

I've stamped a sentiment in one of the larger stars, some astronomy charts towards the bottom and then stamped and cut out a pointy finger to highlight the sentiment. The gold stars are punched from tomato paste tube metal (with the smaller punch I used when I made masks for the printed layer). A wee snippet of film strip ribbon seemed to tie it all together.

Not very typical for me but it was fun to get painty for a change! It may not be the perfect mono printing surface but the acrylic block made a good play surface if you're anything like me and just fancy a dabble!

Stamps:
Past Times by Hero Arts
Reach for the Stars by CHF (retired)

Other:
Large and small star squeeze punches by Fiskars
Lamp black, burnt umber and titanium white Americana acrylic paints by DecoArt
Dazzlong gold metallic acrylic paint by DecoArt
Tim Holtz Film Strip ribbon
Brilliance ink - Graphite Black
Tomato paste tube metal

As ever, there's the chance of a prize (lovely limited edition paints from PaperArtsy this time!) and of having your card in print in the magazine if you're the winner - we'd love to have you play along! All the details, including the deadline, can be found here.